Only released in EOL distros:
Package Summary
The adhoc_communication package allows to exchange data over an ad-hoc network setup by robots running the corresponding node. The package allows you to exchange data over serveral roscores by wrapping transmitting the data to the destination and publishing the data on a predefined topic at the destination host. Routing is accomplished using the hostname of the robots.
- Maintainer status: developed
- Maintainer: Guenther Cwioro <g.cwioro AT gmx DOT net>
- Author: Guenter Cwioro <g.cwioro AT gmx DOT net>, Torsten Andre <torsten.andre AT aau DOT at>
- License: BSD
- Source: git https://github.com/aau-ros/aau_multi_robot.git (branch: hydro)
Package Summary
The adhoc_communication package allows to exchange data over an ad-hoc network setup by robots running the corresponding node. The package allows you to exchange data over serveral roscores by wrapping transmitting the data to the destination and publishing the data on a predefined topic at the destination host. Routing is accomplished using the hostname of the robots.
- Maintainer status: developed
- Maintainer: Guenther Cwioro <g.cwioro AT gmx DOT net>
- Author: Guenter Cwioro <g.cwioro AT gmx DOT net>, Torsten Andre <torsten.andre AT aau DOT at>
- License: BSD
- Source: git https://github.com/aau-ros/aau_multi_robot.git (branch: indigo)
Overview
The node adhoc_communication allows you to exchange data over an ad-hoc network protocol via dynamic source routing. The package allows you to exchange data over serveral roscores. The node will send the data to the destination robot and publish the message on the destination on a given topic. The routing is done with the hostname of the robots.
The node implements three types of routing:
Unicast
One-to-One communication - the data will be transmitted to one destination robot.
Multicast
One-to-Many communication. Every robot has its own multicast group, which will be created when the adhoc_communication node is starting. The name of the group will be "mc_" plus the hostname. If a robots hostname is "bob", its multicast group is called "mc_bob". All other robots can join a group with the service join_mc_group. All members of a group can send data within this group.
Broadcast
Broadcasts will be received and published from all robots.
Related Documentation
Please refer to the following paper to retrieve more information on the node:
@InProceedings{Andre2014,
  Title                    = {Coordinated Multi-Robot Exploration: Out of the Box Packages for {ROS}},
  Author                   = {Andre, T. and Neuhold, D. and Bettstetter, C.},
  Booktitle                = {Proc. of IEEE GLOBECOM WiUAV Workshop},
  Year                     = {2014},
  Month                    = dec,
}
You may obtain the paper from IEEEXplore or search in Google Scholar.
Running the Node
It's VERY IMPORTANT that the node always runs with root rights because the protocol is implement using raw sockets requiring root.
Mark node to automatically run as root by setting the SUID bit:
sudo chown root adhoc_communication
chmod +s adhoc_communication
ROS API
Bandwith
As the program doesn't run in the kernel space, it's not that fast as other common network protocols like TCP/IP. The main purpose was to create a node which allows you to exchange data between several roscores and not to create a high speed multimedia exchange protocol.
Send custom ROS messages
Because there is no generic method to deserialize ROS Messages the node is not able to send all type of ROS Messages by default. If you want to send custom message with the adhoc_communcation node you either must serialize/deserialze the message in your code or extend my node to provide a service to send a custom message.
How to serialize messages in you code
To send custom messages you just need to serialize a message to a string and then send it with the service send_string. To serialize any type of ROS message you can use this function:
template <class t>
std::string getSerializedMessage(t message)
{
    /* Description:
     * returns a serialized ROS message as string to send it over network.
     */
    uint32_t serial_size = ros::serialization::serializationLength(message);
    boost::shared_array<uint8_t> buffer(new uint8_t[serial_size]);
    ros::serialization::OStream streamOut(buffer.get(), serial_size);
    ros::serialization::serialize(streamOut, message);

    std::string serialized_map = "";
    serialized_map.append((const char*) buffer.get(), serial_size);

    return serialized_map;
}
On the receiver side you need to listen on the topic you serialized message will be published and deserialize it back to an object. Following function will allow you to deserialize any type of ROS messages.
template <class t>
void desializeObject(unsigned char* serialized_message, uint32_t length, t * obj)
{
    /* Description:
     * de-serialize a ROS message from a buffer.
     */

    try
    {
        ros::serialization::IStream stream(serialized_message, length);
        ros::serialization::deserialize(stream, *obj);
    } catch (ros::serialization::StreamOverrunException e)
    {
        ROS_ERROR("IN desializeObject: NODE THROWS EXCEPTION: %s ", e.what());
        ROS_ERROR("PARAMETERS: length=[%u] object type=[%s]", length, typeid (*obj).name());
    }
}
How to add a service to send a custom message
In this tutorial you will learn how to extend the adhoc_communcation node by implementing a new service allowing to send your own ROS message. In this tutorial a service that is able to send messages of the type geometry_msgs::Quaternion will be implemented, but you can choose any other ROS message when you work through this tutorial. NOTE: The code to adapt is marked with the tag /*Tutorial*/ in the screen shots.
Step 1 - Define Payload
File: defines.h
Define the payload type of the frame. This value must be unique w.r.t. to all payload types. 
Step 2 - Add a new service definition in the package
Folder: srv
File: sendQuaternion.srv
File content:
string topic
geometry_msgs/Quaternion Quaternion
string destinationHost
---
uint8 successfullySend
Include the service in header.h
#include "mapExchange/sendQuaternion.h"
Step 3 - Implementation
File: ad_hoc_communication.cpp
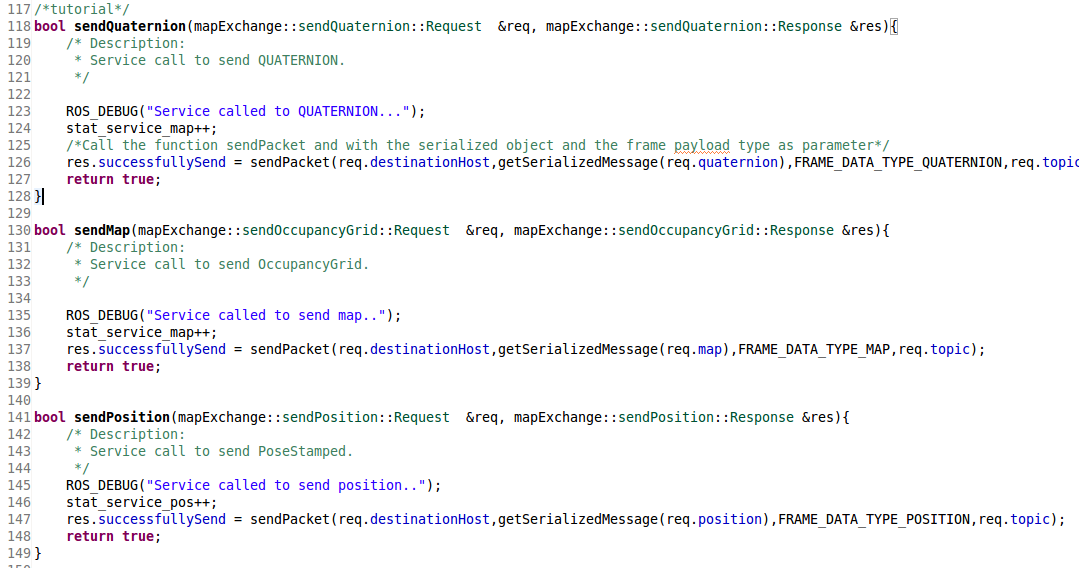
Implement the function for the service call. Add the function to the other service calls. In this case call the function 'send Quaternion'. The parameter of the functions are a service request and a service response of the service that was created in Step 2.  Advertise the Service.
Function: main()
Service name is send_quaternion. 
Step 4 - Implementation II
Create a function to create a quaternion from the serialization string. 
Step 5 - Implementation III
File: ad_hoc_communication.cpp
Function: publishPacket
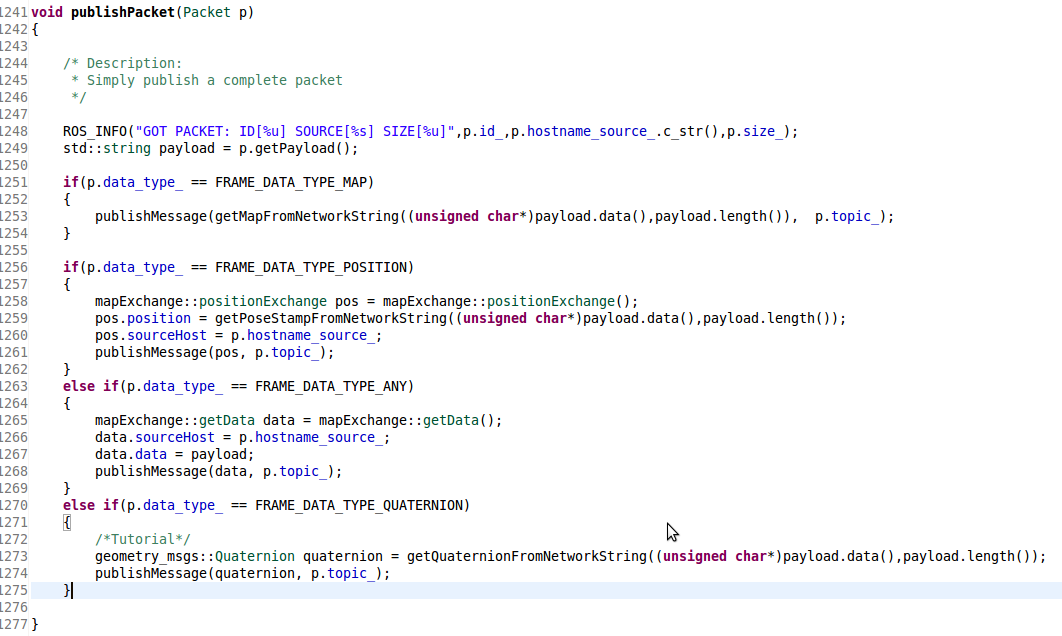
Adapt the function publishPacket that the new payload type will be published. To deserialize the message, the function from Step 4 is used. 


