| |
Building A ROS Android App
Description: This tutorial explains how to set up your environment to build a ROS Android AppTutorial Level: BEGINNER
Overview
This needs to be moved to a relevant location and updated - alot of the information here is useful though. |
The android application platform client lives in the android_remocons package. The android applications use libraries from the android_core package.
Android Studio
Follow the instructions here to download and set up Android Studio if you do not have it already.
Building An Android App
The ROS Android Apps can be found on GitHub here.
There are many ways to build an app. The simplest way is to first clone the app repository somewhere, perhaps a working directory:
$ git clone -b hydro-standalone https://github.com/ros-java/android_apps.git
Next open up Android Studio. If you followed the installation instructions linked above, you can just type in a terminal:
$ studio.sh
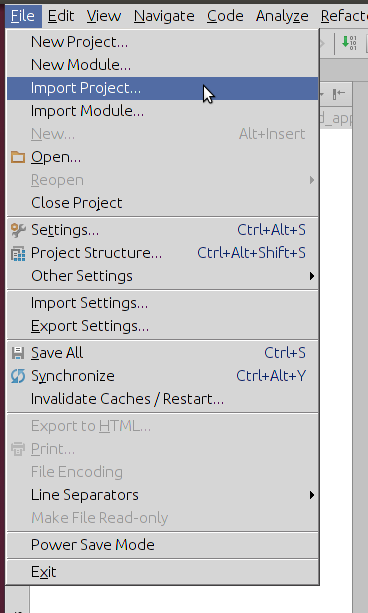
If this is the first time you are opening up Android Studio you may get a dialog window where you can choose to Import Project.
Otherwise File->Import Project and then browse to where you cloned the ROS Android Apps repository. You can simply import the whole android_apps folder as a project.
Choose to "Import project from external model" and select Gradle.
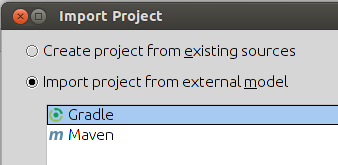
Hit 'Next' and on the following screen choose the radio button for "Use gradle wrapper (recommended)".
You'll see the project open up in Android Studio as shown below:
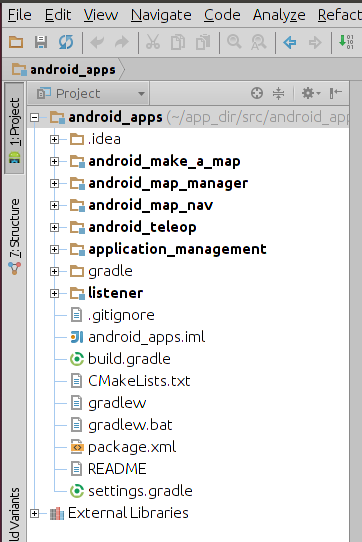
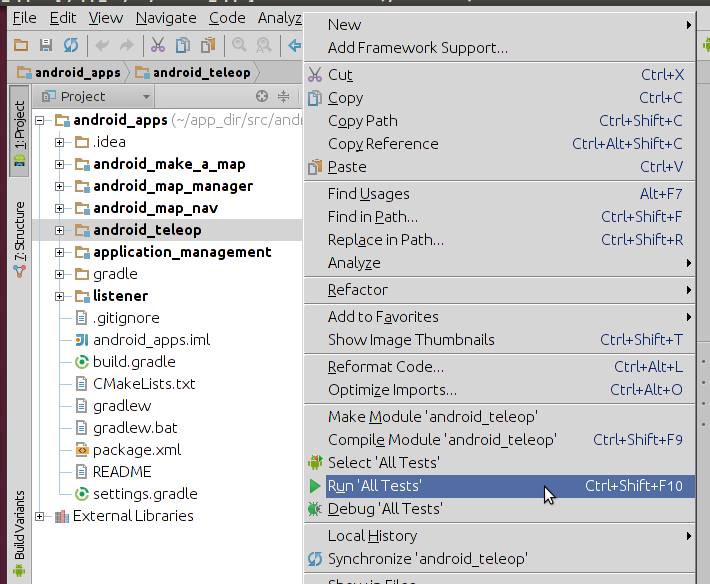
The bold folders are apps that you can build. For example, you can build android_teleop by right-clicking and selecting "Run". If you want to load the app on to a device, make sure one is connected to your computer via usb. Otherwise it will run in the emulator. Really though we just want to see if it builds, so we don't care if it actually loads on to a device or the emulator. Just make sure you don't get any build errors.
Writing An Android App
This will show you how to use existing libraries to write your own Android apps. We'll write a sample app that connects to a "robot", your computer, and lets your device send images from its camera(s) to the robot. This tutorial tries to be accessible for people with varying degrees of ROS and/or Android background.
If you don't have a lot of ROS background, here are some concepts you might want to be familiar with:
If yo don't have a lot of Android background, here are some concepts you might want to be familiar with:
* Layouts
* Gradle Build Tasks and Dependencies
To see images from your Android device on your computer you will need some additional ROS packages installed on your machine. First configure your sources. Then install the following packages:
$ sudo apt-get install ros-hydro-image-view ros-hydro-image-transport-plugins
$ sudo apt-get install ros-hydro-ros ros-hydro-common-msgs
To get started, you can create a new empty app in Android Studio. Since you already have the android_apps package open, you can just right-click that folder and choose New -> Module.
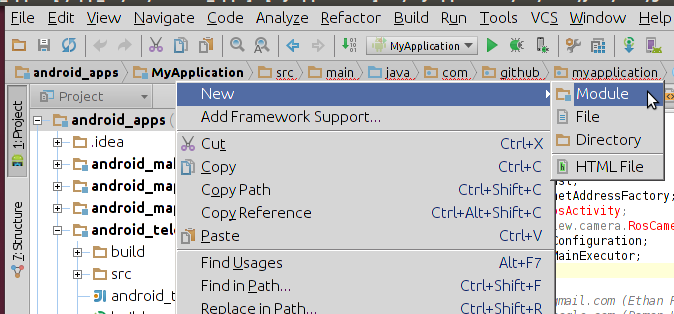
You can go through the resulting dialog choosing to create a new Android Application and accepting all the defaults. Although you can change the package name, etc, if desired. As shown below, this new app (MyApplication) should show up alongside the other apps in sidebar of Android Studio.

Once you've created a new blank application, we can start coding. The following is the full code for the MainActivity.java. We'll break it down below.
   1 /*
   2  * Copyright (C) 2011 Google Inc.
   3  *
   4  * Licensed under the Apache License, Version 2.0 (the "License"); you may not
   5  * use this file except in compliance with the License. You may obtain a copy of
   6  * the License at
   7  *
   8  * http://www.apache.org/licenses/LICENSE-2.0
   9  *
  10  * Unless required by applicable law or agreed to in writing, software
  11  * distributed under the License is distributed on an "AS IS" BASIS, WITHOUT
  12  * WARRANTIES OR CONDITIONS OF ANY KIND, either express or implied. See the
  13  * License for the specific language governing permissions and limitations under
  14  * the License.
  15  */
  16
  17 package com.example.myapplication;
  18
  19 import android.hardware.Camera;
  20 import android.os.Bundle;
  21 import android.os.Handler;
  22 import android.view.MotionEvent;
  23 import android.view.Window;
  24 import android.view.WindowManager;
  25 import android.widget.Toast;
  26 import org.ros.address.InetAddressFactory;
  27 import org.ros.android.RosActivity;
  28 import org.ros.android.view.camera.RosCameraPreviewView;
  29 import org.ros.node.NodeConfiguration;
  30 import org.ros.node.NodeMainExecutor;
  31
  32 /**
  33  * @author ethan.rublee@gmail.com (Ethan Rublee)
  34  * @author damonkohler@google.com (Damon Kohler)
  35  */
  36
  37 public class MainActivity extends RosActivity {
  38
  39     private int cameraId = 0;
  40     private RosCameraPreviewView rosCameraPreviewView;
  41     private Handler handy = new Handler();
  42
  43     public MainActivity() {
  44         super("CameraTutorial", "CameraTutorial");
  45     }
  46
  47     Runnable sizeCheckRunnable = new Runnable() {
  48         @Override
  49         public void run() {
  50             if (rosCameraPreviewView.getHeight()== -1 || rosCameraPreviewView.getWidth()== -1) {
  51                 handy.postDelayed(this, 100);
  52             } else {
  53                 Camera camera = Camera.open(cameraId);
  54                 rosCameraPreviewView.setCamera(camera);
  55             }
  56         }
  57     };
  58     @Override
  59     protected void onCreate(Bundle savedInstanceState) {
  60         super.onCreate(savedInstanceState);
  61         requestWindowFeature(Window.FEATURE_NO_TITLE);
  62         getWindow().addFlags(WindowManager.LayoutParams.FLAG_FULLSCREEN);
  63         setContentView(R.layout.activity_main);
  64         rosCameraPreviewView = (RosCameraPreviewView) findViewById(R.id.ros_camera_preview_view);
  65     }
  66
  67     @Override
  68     protected void init(NodeMainExecutor nodeMainExecutor) {
  69         NodeConfiguration nodeConfiguration =
  70                 NodeConfiguration.newPublic(InetAddressFactory.newNonLoopback().getHostAddress());
  71         nodeConfiguration.setMasterUri(getMasterUri());
  72         nodeMainExecutor.execute(rosCameraPreviewView, nodeConfiguration);
  73         handy.post(sizeCheckRunnable);
  74     }
  75
  76     @Override
  77     public boolean onTouchEvent(MotionEvent event) {
  78         if (event.getAction() == MotionEvent.ACTION_UP) {
  79             int numberOfCameras = Camera.getNumberOfCameras();
  80             final Toast toast;
  81             if (numberOfCameras > 1) {
  82                 cameraId = (cameraId + 1) % numberOfCameras;
  83                 rosCameraPreviewView.releaseCamera();
  84                 rosCameraPreviewView.setCamera(Camera.open(cameraId));
  85                 toast = Toast.makeText(this, "Switching cameras.", Toast.LENGTH_SHORT);
  86             } else {
  87                 toast = Toast.makeText(this, "No alternative cameras to switch to.", Toast.LENGTH_SHORT);
  88             }
  89             runOnUiThread(new Runnable() {
  90                 @Override
  91                 public void run() {
  92                     toast.show();
  93                 }
  94             });
  95         }
  96         return true;
  97     }
  98
  99 }
Let's break this down.
   1 package com.example.myapplication;
   2
   3 import android.hardware.Camera;
   4 import android.os.Bundle;
   5 import android.os.Handler;
   6 import android.view.MotionEvent;
   7 import android.view.Window;
   8 import android.view.WindowManager;
   9 import android.widget.Toast;
  10
  11 import org.ros.address.InetAddressFactory;
  12 import org.ros.android.RosActivity;
  13 import org.ros.android.view.camera.RosCameraPreviewView;
  14 import org.ros.node.NodeConfiguration;
  15 import org.ros.node.NodeMainExecutor;
At first we just declare our package name and which classes we want to import from where. These classes come from standard Android libraries and also from custom ROS Android libraries that have already been written. Later when we make the build script (build.gradle) we'll make sure to pull in the .aar files so we can use these classes.
Next we fill in our MainActivity class. If you didn't read about them above, you can learn about Android Activities here. Our MainActivity extends RosActivity. All ROS Android apps should extend this class to be compatible with the android_remocons interface. You don't need to know too much about that, but basically extending this class gives you some convenient ROS functionality/compatibility for free. If you're familiar with ROS you might be wondering, how do I deal with initialising nodes, etc, in Android? That's what extending RosActivity is for.
We also make a cameraId in case there are multiple cameras, so we can keep track and switch between them. We need a view, which is a RosCameraPreviewView. This view will display the images from the device's camera(s) on the screen. We imported that from an external library above. Our constructor can just be the default and call to the parent constructor.
   1     @Override
   2     protected void onCreate(Bundle savedInstanceState) {
   3         super.onCreate(savedInstanceState);
   4         requestWindowFeature(Window.FEATURE_NO_TITLE);
   5         getWindow().addFlags(WindowManager.LayoutParams.FLAG_FULLSCREEN);
   6         setContentView(R.layout.activity_main);
   7         rosCameraPreviewView = (RosCameraPreviewView) findViewById(R.id.ros_camera_preview_view);
   8     }
Then we fill in the OnCreate() function. This will run when the app is opened. We may want to retrieve information from the last time the app was opened, which is where the savedInstanceState comes in. This is also where we can create views and set up the app's appearance. Later we'll configure this more from the activity_main.xml that defines the app layout. Here you can see we retrieve information from that file. Right now it just contains default information, but we'll change it later.
If you're not familiar with Android layout resources then you can go here for more information or for information about resource types in general try here.
   1     @Override
   2     protected void init(NodeMainExecutor nodeMainExecutor) {
   3         NodeConfiguration nodeConfiguration =
   4                 NodeConfiguration.newPublic(InetAddressFactory.newNonLoopback().getHostAddress());
   5         nodeConfiguration.setMasterUri(getMasterUri());
   6         nodeMainExecutor.execute(rosCameraPreviewView, nodeConfiguration);
   7         handy.post(sizeCheckRunnable);
   8     }
Next, we need something to handle the configuration of our ROS node(s) and other administration. We have this init() function, which is another handy benefit of extending RosActivity. We want to make sure our initial cameraId is zero. Then we connect up our view to a camera. So the app will start out showing and transmitting images from the "first" camera. We configure our connection to the "robot", your computer. When you start the app, you will give it the ROS_MASTER_URI. The app uses this to connect to your computer and the ROS master running on it. Once it has that information it can configure its node(s) and send images to your computer. If that doesn't make sense to you, you might want to check out how the ROS Computation Graph works. Once the nodes have been initialized, we will setup the preview for the camera. We dont want to set the camera before the view is ready, so we run a repeating task to check the height and width. Once those have been set, we set the camera as well.
   1 @Override
   2     public boolean onTouchEvent(MotionEvent event) {
   3         if (event.getAction() == MotionEvent.ACTION_UP) {
   4             int numberOfCameras = Camera.getNumberOfCameras();
   5             final Toast toast;
   6             if (numberOfCameras > 1) {
   7                 cameraId = (cameraId + 1) % numberOfCameras;
   8                 rosCameraPreviewView.releaseCamera();
   9                 rosCameraPreviewView.setCamera(Camera.open(cameraId));
  10                 toast = Toast.makeText(this, "Switching cameras.", Toast.LENGTH_SHORT);
  11             } else {
  12                 toast = Toast.makeText(this, "No alternative cameras to switch to.", Toast.LENGTH_SHORT);
  13             }
  14             runOnUiThread(new Runnable() {
  15                 @Override
  16                 public void run() {
  17                     toast.show();
  18                 }
  19             });
  20         }
  21         return true;
  22     }
  23 }
Lastly, we program the onTouchEvent() function. This function gets called when you touch the screen (who would've guessed?). When you tap the screen it will switch to show images from the other camera if appropriate. You can see the check for the number of cameras and then, if there are multiple cameras, the cameraId changes. We set the rosCameraPreviewView to show images from a camera with the new ID. Then we make a Toast message notifying the user. Similarly, if there is only one camera then we tell the user.
Now that we have our MainActivity written we want to update our AndroidManifest.xml. Basically we define our package name and version number and also the minimum Android SDK requirements. Next we say what we want our app to have access to, for example in this case we want it to access the camera, the state of the wireless connection, etc. We also define the app icon, orientation and display name. Using intent-filters we decide how activities in our app can be accessed. For more information about how this file is used go here. This is roughly what it should look like when finished:
   1 <?xml version="1.0" encoding="utf-8"?>
   2 <manifest xmlns:android="http://schemas.android.com/apk/res/android"
   3           package="com.example.myapplication"
   4           android:versionCode="1"
   5           android:versionName="1.0" >
   6
   7     <uses-sdk android:minSdkVersion="17" />
   8
   9     <uses-permission android:name="android.permission.ACCESS_WIFI_STATE" />
  10     <uses-permission android:name="android.permission.CAMERA" />
  11     <uses-permission android:name="android.permission.CHANGE_WIFI_STATE" />
  12     <uses-permission android:name="android.permission.INTERNET" />
  13     <uses-permission android:name="android.permission.WAKE_LOCK" />
  14     <uses-permission android:name="android.permission.WRITE_EXTERNAL_STORAGE" />
  15
  16     <application
  17             android:icon="@drawable/ic_launcher"
  18             android:label="@string/app_name" >
  19         <activity
  20                 android:name="com.example.myapplication.MainActivity"
  21                 android:configChanges="orientation|keyboardHidden"
  22                 android:label="@string/app_name"
  23                 android:screenOrientation="landscape" >
  24             <intent-filter>
  25                 <action android:name="android.intent.action.MAIN" />
  26
  27                 <category android:name="android.intent.category.LAUNCHER" />
  28             </intent-filter>
  29         </activity>
  30         <activity android:name="org.ros.android.MasterChooser" />
  31
  32         <service android:name="org.ros.android.NodeMainExecutorService" >
  33             <intent-filter>
  34                 <action android:name="org.ros.android.NodeMainExecutorService" />
  35             </intent-filter>
  36         </service>
  37     </application>
  38
  39 </manifest>
You'll also want to change the default layout files just a little bit. There should be a file generated in MyApplication/src/main/res/layout called activity_main.xml. This file helps define how our app will look. You can use this to organise layouts. For example we define a RosCameraPreviewView in this file with an ID of ros_camera_preview_view. You may remember accessing the item with that ID in the code of the MainActivity. For more information on the contents of this file go here. Our activity_main.xml will look like this:
   1 <?xml version="1.0" encoding="utf-8"?>
   2 <LinearLayout xmlns:android="http://schemas.android.com/apk/res/android"
   3               android:layout_width="fill_parent"
   4               android:layout_height="fill_parent"
   5               android:orientation="vertical" >
   6
   7     <org.ros.android.view.camera.RosCameraPreviewView
   8             android:id="@+id/ros_camera_preview_view"
   9             android:layout_width="fill_parent"
  10             android:layout_height="fill_parent" />
  11
  12 </LinearLayout>
Lastly you want to make sure it all builds. The relevant file is MyApplication/src/build.gradle. IT should look like this when you're finished:
dependencies {
    compile 'ros.android_core:android_honeycomb_mr2:0.0.0-SNAPSHOT'
}

apply plugin: 'android'

android {
    compileSdkVersion 17
    buildToolsVersion androidBuildToolsVersion
}
We've been referring to classes in this app that we didn't write and exist outside of this package. To make sure that Gradle pulls them in when we build we add the library as a dependency in our build.gradle. The top-level build.gradle file in the android_apps folder points to the location of the .aar file for that library. Since we made our app under that directory we can just refer to it here. We can also apply plugins and specify the SDK version. Make sure this version is the same as the one you specified in the AndroidManifest.xml.
A further note on the library you are building against. This library and other libraries are compiled with a set number of ROS message packages included. This means that you can use any of the messages that were included when the libraries were built. If you move on to more advanced applications with custom messages or messages that were not included then you can compile the libraries and messages yourself from source as described here
Now you should be able to build it. You can follow the same steps as you did before when building the android_teleop app. Just right-click and Run All Tests. Make sure you have a device plugged in via USB with usb debugging enabled. This should load the app onto your device.
If you are having an issue, try unplugging the device from the computer. See if a dialog appears on the device asking you to accept an RSA key. Accept the key and try again.
Your device should be on the same network as your computer.
Open two shells. In both:
$ source /opt/ros/hydro/setup.bash
In one:
$ roscore
Open the app on your device and enter the IP address of your computer instead of "localhost". In the other shell run:
$ rosrun image_view image_view image:=camera/image _image_transport:=compressed
You should see a popup with images from your device's camera. Tap the screen to switch between cameras.
Advanced
You may encounter limitations in the existing libraries or want to expand on them. At this point you will need to download the supporting libraries from source. You will need to clone the source code for the libraries and build them in catkin workspaces. The instructions found here will show you how to do that.
If you are a developer of the ROS Android stacks and you need to update the library artifacts that are being used to build the apps in this tutorial you can look here.


