


Planet ROS
Planet ROS - http://planet.ros.org
Planet ROS - http://planet.ros.org![]() http://planet.ros.org
http://planet.ros.org
ROS Discourse General: Avoid dynamic loading of libraries (on Windows)
Hello.
I am currently working on a recipe to build a ros2-godot plugin ( GitHub - Kotakku/ros2-for-godot · GitHub ) on Windows. The goal is to have a ‘standalone’ plugin embedding all the needed dll (so without needing to install a ROS environment). Please note that I do not know a lot about ROS2…
I have an issue with dynamically loaded libraries, because the plugin directory in not in the PATH envvar, and so those dlls are not found.
The RMW implementation can be made static, thanks to CMake variables. Same with the rcl_logging implementation. Great !
But, there’s still the dlls loaded by rosidl_dynamic_typesupport. Is there any way to avoid dynamic loading of typesupport dlls (such as rmw_dds_common__rosidl_typesupport_fastrtps) ?
1 post - 1 participant
ROS Discourse General: Complete Guide: Teleoperating the AgileX NERO Arm with Pika Sense (Single & Dual Arm)
0. Preface
Pika Sense provides an intuitive teleoperation interface for robotic manipulation and data collection. Combined with Pika Station, Pika Gripper, and the AgileX NERO robotic arm, it enables low-latency end-effector teleoperation for both single-arm and dual-arm systems.

This tutorial walks through the complete setup process, and serves as a reference for developers who want to integrate Pika Sense with their own robotic arms.
warning: Pika Sense currently supports:
- AgileX PiPER
- AgileX PiPER-X
- AgileX NERO
- xArm Lite 6
Support for additional robotic arms can be added by implementing the corresponding teleoperation interface. We welcome community contributions. If you successfully adapt another robotic arm, feel free to submit a Pull Request to our GitHub repository.
1.Hardware Preparation
This section describes the hardware setup required for teleoperating a single AgileX NERO robotic arm with its default NERO gripper.
- When assembling the robotic arm, align the red alignment marks on the arm connectors with the corresponding red marks on the cables.
- The textured sleeve on the aviation connector is the locking mechanism. During installation, align the red mark downward with the locating notch and push the connector straight in. To disconnect it, press the textured sleeve and then pull the connector out.
- If you are using a third-party robotic arm, you can follow the same hardware connection procedure described for the NERO arm.
- For third-party robotic arms, you must additionally verify that the power supply, communication interfaces, end-effector interfaces, and control protocols meet the requirements for teleoperation.
Step 1 – Connect the NERO Robotic Arm
Connect the NERO robotic arm as shown in the wiring diagram below. For detailed wiring instructions, please refer to the NERO User Manual.

When powering on the robot for the first time, complete the following steps in order (A–G):
- Connect connector A to the J2 port.
- Connect the CAN cable of aviation connector B.
- Connect the XT30 connector C.
- Align the red dots on aviation connector D, then plug it in with the red dot facing downward.
- Connect the plug of power adapter E.
- Verify that the AC power cord of power adapter E is properly connected, then power on the system. Wait until the indicator LED on the control panel starts flashing green.
- Connect the USB cable to your computer to begin using the device.
Step 2 - Connect Pika Sense
Next, connect the Pika Sense device.
For detailed information about the Pika Sense interfaces and wiring, refer to Section 1.1 of the Pika Positioner & Sense User Guide (Positioning and Calibration).
2.SoftWare Preparation
Step 1.Install System Dependencies
Before running the teleoperation software, install the required system packages:
sudo apt update && sudo apt install ethtool
sudo apt update && sudo apt install can-utils
Step 2.Install Conda
Install either Miniconda or Anaconda before proceeding.
If Conda is already installed, you can skip this step.
Step 3.Create the Pika Teleoperation Python Environment
Create a dedicated Conda environment for Pika teleoperation:
conda create -n pika python=3.10
conda activate pika
conda install pinocchio==3.2.0 casadi==3.6.7 -c conda-forge
pip install lark numpy==2.0.2 empy==3.3.4 meshcat pyyaml piper-sdk opencv-python ur-rtde netifaces catkin_pkg
3.Starting Teleoperation
3.1 Single-Arm Teleoperation
Step 1 – Activate the CAN Interface
Connect the robotic arm’s CAN cable to your computer, then activate the CAN interface by running:
cd ~/pika_ros/src/PikaAnyArm/agx_arm/agx_arm_ros/scripts

bash can_activate.sh
Step 2 – Calibrate Pika Sense
Before starting teleoperation, calibrate the Pika Sense device.
For detailed calibration instructions, please refer to Sections 1.2 and 1.3 of the Pika Positioner & Sense User Guide (Positioning and Calibration).
Step 3 – Launch the Teleoperation Program
Choose the appropriate launch procedure according to your hardware configuration.
Option A – Using Pika Sense without the Pika Gripper
If you are not using a Pika Gripper, launch the following programs.
Terminal 1
source ~/pika_ros/install/setup.bash

cd ~/pika_ros/scripts

bash start_single_sensor_whit_teleop.bash
Terminal 2
source ~/pika_ros/install/setup.bash

conda activate pika

# Launch the appropriate teleoperation node for your robot:

# piper
ros2 launch pika_remote_agx_arm teleop_single_piper.launch.py
# piper_x
ros2 launch pika_remote_agx_arm teleop_single_piper_x.launch.py
# nero
ros2 launch pika_remote_agx_arm teleop_single_nero.launch.py
After both terminals are running, double click the Pika Sense trigger to enable teleoperation.
Option B - Using Pika Sense with Pika Gripper
If a Pika Gripper is mounted on the robotic arm and controlled by Pika Sense, first bind one Pika Sense with one Pika Gripper by following the instructions in the Pika Positioner & Sense User Guide (Positioning and Calibration).
Terminal 1
conda deactivate

source ~/pika_ros/install/setup.bash

cd ~/pika_ros/scripts

bash start_sensor_gripper.bash
Terminal 2
source ~/pika_ros/install/setup.bash
conda activate pika

# Launch the appropriate teleoperation node for your robot:
# piper
ros2 launch pika_remote_agx_arm teleop_single_piper.launch.py
# piper_x
ros2 launch pika_remote_agx_arm teleop_single_piper_x.launch.py
# nero
ros2 launch pika_remote_agx_arm teleop_single_nero.launch.py
Once the system is running, double click the Pika Sense trigger to start teleoperation.
3.2 Dual-Arm Teleoperation
Step 1 – Configure the CAN Interfaces
Before starting dual-arm teleoperation, both robotic arms must be assigned to the correct CAN interfaces.
First, connect the left robotic arm to your computer via the CAN adapter, then run:
cd ~/pika_ros/src/PikaAnyArm/agx_arm/agx_arm_ros/scripts
bash find_all_can_port.sh
The terminal will display the USB port corresponding to the left arm.
Next, connect the right robotic arm and run the script again:
bash find_all_can_port.sh
The terminal will display the USB port corresponding to the right arm.
Open the can_config.sh file and copy the two detected USB port IDs into Lines 111 and 112, respectively.
For example, when using PiPER, the configuration should look like:
if [ "$EXPECTED_CAN_COUNT" -ne 1 ]; then
    declare -A USB_PORTS
    USB_PORTS["1-8.1:1.0"]="can_left:1000000"   # Left arm
    USB_PORTS["1-8.2:1.0"]="can_right:1000000"  # Right arm
fi
After saving the configuration, activate both CAN interfaces:
cd ~/pika_ros/src/PikaAnyArm/agx_arm/agx_arm_ros/scripts

bash can_config.sh
Step 2 – Calibrate Pika Sense and Bind Pika Devices
Calibrate the Pika devices before starting teleoperation. For detailed instructions, refer to the Pika User Manual, including the the Pika Positioner & Sense User Guide (Positioning and Calibration) section for base station deployment and Pika Sense calibration, followed by the Pika Device Binding section to bind the left and right Pika Sense devices.
Step 3 – Launch the Dual-Arm Teleoperation Program
Choose the launch procedure according to your hardware configuration.
Option A – Using Pika Sense without the Pika Gripper
If you are not using Pika Grippers, or you are using the robot’s original grippers, first bind two Pika Sense devices following the Pika Device Binding Guide.
Terminal 1
conda deactivate
source ~/pika_ros/install/setup.bash
cd ~/pika_ros/scripts && bash start_multi_sensor_whit_teleop.bash sensor
Terminal 2
source ~/pika_ros/install/setup.bash
conda activate pika

# Launch the appropriate teleoperation node for your robot:
# piper
ros2 launch pika_remote_agx_arm teleop_double_piper.launch.py
# piper_x
ros2 launch pika_remote_agx_arm teleop_double_piper_x.launch.py
# nero
ros2 launch pika_remote_agx_arm teleop_double_nero.launch.py
Finally, double click the right Pika Sense trigger to start dual-arm teleoperation.
Important Note Ensure that the orientation of the Pika Sense matches the orientation of the robot end-effector before enabling teleoperation.
Option B – Using Pika Grippers
If Pika Grippers are installed on both robotic arms, first bind:
- Two Pika Sense devices
- Two Pika Grippers
using the Pika Device Binding section section 2.6, after that:
Terminal 1 —— Start Pika Sense
conda deactivate

source ~/pika_ros/install/setup.bash

cd ~/pika_ros/scripts

bash start_multi_sensor_whit_teleop.bash
Terminal 2 —— Start Pika Grippers
conda deactivate
source ~/pika_ros/install/setup.bash
cd ~/pika_ros/scripts && bash start_multi_gripper.bash #pika gripper
Terminal 3 —— Launch the Robot
source ~/pika_ros/install/setup.bash
conda activate pika

# Launch the appropriate teleoperation node for your robot:
# piper
ros2 launch pika_remote_agx_arm teleop_double_piper.launch.py
# piper_x
ros2 launch pika_remote_agx_arm teleop_double_piper_x.launch.py
# nero
ros2 launch pika_remote_agx_arm teleop_double_nero.launch.py
Finally, double click the right Pika Sense trigger to start teleoperation.
Important Note Ensure that the orientation of the Pika Sense matches the orientation of the robot end-effector before enabling teleoperation.
4.Configuration Files
The configuration files for each supported robot are organized as follows:
config/
├── piper_rand_params.yaml
│   └── gripper_xyzrpy
│       Offset from Joint 6 to the gripper frame (m, rad)
│
├── xarm_params.yaml
│   ├── eff_position
│   │   Initial TCP pose (mm, rad)
│   └── pika_to_arm
│       Pika coordinate system → Robotic arm end-effector coordinate system (m, rad)
│
└── ur12e_params.yaml
    ├── pika_to_arm
    │   Pika coordinate system → Robotic arm end-effector coordinate system (m, rad)
    └── robot_ip
        IP address of UR arm
5. Coordinate Frames and ROS Topics
To help developers integrate Pika Sense with their own robotic arms, this section describes:
- The Pika gripper coordinate frame
- The
/pika_poseROS topics
5.1 Pika Coordinate Frame

The Pika coordinate frame is defined at the center of the Pika gripper and is published through the /pika_pose topic.
When teleoperation is activated by double-clicking the Pika Sense gripper, the current pose of the Pika Sense is recorded as the reference (zero) pose. All subsequent position and orientation commands are expressed relative to this reference frame.
The coordinate axes of the /pika_pose frame are defined as follows:
- X-axis: Forward
- Y-axis: Left
- Z-axis: Up
5.2 ROS Topics
For single-arm teleoperation, Pika Sense publishes the robot target pose to: /pika_pose For dual-arm teleoperation, the left and right Pika Sense devices publish to separate topics: /pika_pose_l /pika_pose_r All of these topics use the standard ROS message type: geometry_msgs/PoseStamped Since most industrial robot controllers provide Cartesian end-effector control interfaces based on geometry_msgs/PoseStamped, the published pose messages can typically be used directly or converted into robot-specific motion commands with minimal adaptation.
For a complete implementation example, see:
FAQ
Q1 Which robotic arms are currently supported by Pika Sense?
Pika Sense currently supports teleoperation for the following robotic arms:
- AgileX PiPER
- AgileX PiPER-X
- AgileX NERO
- xArm Lite 6
Support for additional third-party robotic arms can be implemented by developers or users based on the robot’s control interface.
Q2. Can I use Pika Sense with a third-party robotic arm?
Yes.
To integrate a third-party robotic arm, the robot should support Cartesian end-effector pose control, or provide an interface that can convert the geometry_msgs/PoseStamped messages published by Pika Sense into robot-specific motion commands.
Q3.Why do I need to double-click the Pika Sense gripper before starting teleoperation?
Double-clicking initializes the teleoperation reference pose.
The current pose of the Pika Sense is recorded as the zero (reference) pose, and all subsequent position and orientation commands are calculated relative to this reference frame.
Q4.Is there anything I should pay attention to when double-clicking the Pika Sense gripper?
Yes.
Before double-clicking, ensure that the orientation of the Pika Sense matches the orientation of the robot end-effector.
Doing so minimizes the initial pose offset and helps ensure that the robot moves intuitively in the same direction as the Pika Sense.
Q5. Which parameters should I pay attention to when integrating a third-party robotic arm?
The most important parameters are:
- The coordinate frame of the robot end-effector (TCP)
- The transformation between the Pika gripper center frame and the robot TCP frame
- The robot controller’s required pose or motion command format
In most cases, the pika_to_arm parameter in the configuration file defines the transformation between the Pika coordinate frame and the robot TCP, making it one of the key parameters to adjust when integrating a new robotic arm.
1 post - 1 participant
ROS Discourse General: Update on BAGEL (BAG ExpLoration): What's New

Hi again,
Following up on my earlier post about BAGEL, a browser-based ROS bag viewer/editor with no native dependencies and no ROS install. Since v1.0 it’s grown from a viewer into something closer to a full robotics debugging tool. Quick links for anyone new here:
Link: https://bagel-ros2.vercel.app
Source: GitHub - Hussain004/BAGEL: ROS Bag Visualizer · GitHub
Full changelog with design rationale: BAGEL/FEATURES.md at main · Hussain004/BAGEL · GitHub
What’s new since v1.0:
Bag editing (v1.1, v1.2)
-
Trim by time range, drop topics you don’t need, export a fresh indexed MCAP, all client-side, no CLI.
-
Works across every format BAGEL reads: .mcap, ROS2 .db3, and ROS1 .bag all edit down to MCAP now.
URDF robot models and richer 3D (v1.3)
-
Drop a URDF (or paste one) and the robot animates in the 3D scene, following the bag’s /tf and joint states.
-
MESH_RESOURCE and TRIANGLE_LIST markers render real meshes instead of a placeholder.
-
CameraInfo overlay (principal point reticle, intrinsics badge), a wireframe camera frustum in the 3D scene, and one-click undistort using the calibration.
-
Saved per-data-type display defaults, loop playback, per-camera frustum hide toggles.
Analysis and shareability (v1.4)
-
Bag Health dashboard: per-topic Hz, jitter, gaps, and bandwidth with color-coded waately see which topic dropped out or is publishing erratically.
-
Inline math expressions as derived plot series (unit conversions, vector magnitudes, bias correction), real tokenizer/AST, no eval.
-
Export any panel as a WebM video or PNG sequence for a time window.
-
Timeline bookmarks/annotations that round-trip through the share URL.
Live robot data (v1.5)
-
The big one: paste a ws:// URL (the same protocol Foxglove Studio and foxglove_bridvery panel updates in real time from a running robot. No ROS install, no account, justa browser tab.
-
Record live sessions straight to a proper indexed MCAP from the browser.
-
Works over ROS1 bridges too, not just ROS2. - Sim clock (/clock) support, so Gazebo/Isaac Sim sessions get correct timestamps ins
-
Cross-bag health comparison when multiple bags are loaded.
Format breadth and RViz parity (v1.6) - Standalone .pcd / .ply viewer, no bag wrapping needed.
-
Foxglove Studio’s JSON-schema MCAPs (foxglove.* types) decode correctly now instead of showing empty panels.
-
WebCodecs-based H264/H265 video decoding for foxglove.CompressedVideo topics.
-
Zoom and pan in the image viewer.
What’s next?
v1.7 is up next: a 3D measurement tool (click two points, get a distance), nav_msgs/Path rendering, more colormaps, image-on-point-cloud projection using camera intrinsics, then bag merge/split, then QoS inspection (surfacing reliability/durability/history per topic).
5 posts - 3 participants
ROS Discourse General: Last Day for ROSCon Global Early Bird Tickets is Sunday, July 12th
Hi Everyone,
Quick reminder that the last day to purchase early bird tickets for ROSCon Global 2026 is this coming Sunday Sun, Jul 12, 2026 7:00 AM UTC. Our early bird tickets are $150 off our regular ticket price and make your ROSCon workshop effectively free!
1 post - 1 participant
ROS Discourse General: Adaptation needs in robotic systems
Hi robotic developers,
Are you working with Behavior Trees, robotics, ROS/ROS 2, autonomous systems, or robot decision-making?
We are conducting a research study on adaptation needs in robotic systems that use Behavior Trees. If you work with robotic systems, we’d greatly appreciate your input.
We’re conducting a short survey to answer two key questions:
-
The relevance of different adaptation needs in robotic systems.
-
The suitability of different BT adaptation approaches for addressing those needs.
Survey: Adaptation Needs in Robotic Systems: Behavior Trees and Beyond (Questionnaire)
It takes about 20 minutes to complete, and as a bonus, you’ll also get an overview of adaptation needs in robotics, the current limitations of Behavior Trees, and the research efforts to address them.
4 posts - 3 participants
ROS Discourse General: Announcing ros-env: Access ROS 2 messages from Rust with just Cargo
Hey all! I’m one of the maintainers of ros2_rust, and we recently released a new crate, ros-env, that aims to unify ROS 2 message consumption in Rust.
If you’re already generating Rust code for your message interfaces with rosidl_generator_rs, you can add ros-env as a regular Cargo dependency and access the message types from any packages in your sourced ROS 2 environment.
// Assuming the Rust crate for `shape_msgs` is in `AMENT_PREFIX_PATH`
use ros_env::shape_msgs::msg::Plane;
You don’t need Colcon, and you don’t need to use ros2_rust. The goal is to provide a common way for Rust ROS 2 clients to consume and share message definitions.
Happy to answer any questions!
1 post - 1 participant
ROS Discourse General: Real-time robot dashboards in React without a separate visualization server
If you’ve built an operator UI or ground station in React, you’ve probably hit the same wall I did: the moment you need real-time telemetry visualization, your options are to run Foxglove or Grafana as separate infrastructure and iframe them in, or hand-roll canvas components from scratch. Neither is great when what you actually want is telemetry views that live natively inside the app you’re already building.
So I built Altara: a set of MIT-licensed React components for real-time telemetry, with a one-line rosbridge adapter so you can pipe a sensor_msgs topic straight into a chart, gauge, or attitude indicator.
A minimal example:
tsx
import { AltaraProvider, TimeSeries } from '@altara/core'
import { createRosbridgeAdapter } from '@altara/ros'

const imu = createRosbridgeAdapter({
  url: 'ws://localhost:9090',
  topic: '/imu/data',
  messageType: 'sensor_msgs/Imu',
})

<AltaraProvider theme="dark">
  <TimeSeries dataSource={imu} height={240} />
</AltaraProvider>
It’s a monorepo of six packages: @altara/core (the base components), @altara/ros (rosbridge adapter with typed factories for common sensor_msgs types), @altara/mqtt, and three domain packages, @altara/aerospace (PFD, HSI, TCAS and other flight instruments), @altara/av (LiDAR point cloud via Three.js, occupancy grid, SLAM map), and @altara/industrial (SCADA-style panels, waterfall spectrogram, alarm annunciator). 41 components total, every one runs in a mockMode so you can build and demo without hardware.
Everything renders to canvas via requestAnimationFrame with the hot path kept out of React, so high-frequency streams don’t cause re-render jank.
It’s early and I’m the only maintainer, so I’m being upfront about that. The architecture is deliberately simple, plain canvas and React, no exotic dependencies, so it’s straightforward to fork and self-maintain if that matters to you.
Website: https://www.usealtara.dev/
Repo: GitHub - JayaSaiKishanChapparam/altara: React components for real-time telemetry dashboards — robotics, aerospace, autonomous vehicles, industrial IoT. PFD, HSI, time-series, gauges, GPS maps, and ROS2/MQTT adapters at 60fps. · GitHub
Live Storybook (all 41 components): @storybook/core - Storybook
Demo: Altara Demo
What are you currently using for in-app telemetry visualization, and where does it fall short? Trying to understand what’s actually missing for people building custom operator interfaces.
4 posts - 3 participants
ROS Discourse General: Plotjuggler 4 (beta!) is here. Unleashing multi-modal data
After few months of hard work, PlotJuggler 4 is finally ready for an early preview!
Expect bugs and missing features, but also ton of awesomeness unleashed.

Everything was brutally optimized. Playing a compressed MCAP, reading lazily the file from disk, and rendering 3 videos and the two 3D scenes above, for a total of 6 pointclouds, uses only 50% of a single CPU core.
Features: too many to list
- 2D: images, compressed images, depth, compressed video (H264, AV1).
- 2D: image rectification!
- 2D: real-time streaming with WebRTC!
- 2D: markers!
- 3D: meshes, occupancygrid, TF2, 3D markers
- 3D: pointclouds, including compressed ones (Draco and Cloudini)
- 3D: multiple cameras control, similar to RViz
On the “core” side
- Refactor data engine that will use up to 5x less memory when loading large datasets.
- To be opened soon: a marketplace of “Extensions” (think VSCode equivalent) to share plugins with others.
- a new parallel MCAP loader that can load compressed MCAPs about 4X faster.
And (this is big) integration with Mosaico to access directly data stored in the cloud.

5 posts - 3 participants
ROS Discourse General: Mastering NERO | How to Configure CAN Leader–Follower Linkage for Dual 7-DoF Robotic Arms
Dual-arm robots are becoming increasingly important in embodied AI, teleoperation, imitation learning, and collaborative manipulation research.
This tutorial demonstrates how to configure two AgileX NERO 7-DOF robotic arms in a leader-follower setup using CAN bus communication. Once configured, the follower arm will automatically replicate the motion of the leader arm in real time.
What You’ll Build
By the end of this guide, you’ll be able to:
![]() Synchronize two NERO robot arms
Synchronize two NERO robot arms
![]() Enable real-time leader-follower motion following
Enable real-time leader-follower motion following
![]() Configure CAN-based dual-arm communication
Configure CAN-based dual-arm communication
![]() Validate coordinated dual-arm operation
Validate coordinated dual-arm operation
![]() Prepare a platform for teleoperation and imitation learning experiments
Prepare a platform for teleoperation and imitation learning experiments
Hardware Requirements
| Component | Quantity |
|---|---|
| NERO 7-DOF Robotic Arm (Leader) | 1 |
| NERO 7-DOF Robotic Arm (Follower) | 1 |
| CAN Communication Cable | 1 |
| NERO Control Software | 1 |
Step 1: Connect the CAN Bus
The first step is connecting the CAN communication lines between the two robot arms.
Wiring Rules
| Wire Color | Signal |
|---|---|
| Yellow | CAN H |
| Blue | CAN L |
Connect:
-
CAN H ↔ CAN H
-
CAN L ↔ CAN L
Important
Before powering on:
-
Verify all connectors are secure.
-
Ensure there are no loose contacts.
-
Check that CAN H and CAN L are not reversed.
Incorrect wiring may prevent communication between the two robotic arms.

Step 2: Configure Leader and Follower Modes
Once the CAN bus connection is complete, assign the role of each robot arm.
Leader Arm
The leader arm acts as the command source.
Responsibilities:
-
Generates motion commands
-
Broadcasts joint states
-
Controls overall synchronization
Follower Arm
The follower arm executes the motion commanded by the leader arm.
Responsibilities:
-
Receives leader motion data
-
Replicates joint trajectories
-
Mirrors the leader’s pose in real time
After configuration, save all parameters before proceeding.
Safety Warning Before Activation
![]() Read This Before Enabling Leader-Follower Mode
Read This Before Enabling Leader-Follower Mode
Before assigning leader-follower roles:
- Move both robotic arms close to their home positions.
- Ensure the workspace is clear.
- Remove any obstacles around the robot.
When synchronization is activated, the follower arm immediately attempts to match the leader’s current pose.
If the initial poses differ significantly, the follower arm may move rapidly, potentially causing:
-
Robot collisions
-
Pinch hazards
-
Hardware damage
-
Personal injury
For safe operation, always align both robots before enabling synchronization.

Step 3: Validate Leader-Follower Synchronization
After configuration, verify that communication and synchronization are functioning correctly.
Validation Procedure
- Check CAN Connections
Verify:
-
CAN H is connected correctly
-
CAN L is connected correctly
-
No loose cables exist
- Verify Control Modes
Confirm:
- Leader mode is enabled
- Follower mode is enabled
- Parameters have been saved successfully
- Move the Leader Arm
Manually operate the leader arm.
- Observe the Leader Arm
The Leader arm should:
- Follow every joint movement
- Replicate end-effector trajectories
- Maintain smooth synchronized motion
Successful tracking indicates that Leader-Follower control is operating correctly.
Software Version Notes
Version 1.1 API Limitation
For NERO software version 1.1:
When Leader-Follower mode is enabled:
- API access is limited to commands issued by the leader arm.
- Independent follower-arm state information cannot be queried separately.
Developers building custom applications should account for this behavior when logging data or implementing monitoring systems.
Conclusion
Using a simple CAN bus connection, two NERO 7-DOF robotic arms can be configured into a synchronized leader-follower system capable of real-time trajectory replication and coordinated motion control.
This setup is particularly useful for:
- Embodied AI development
- Teleoperation platforms
- Imitation learning pipelines
- Robot data collection
- Research and education
By following the wiring, configuration, and safety recommendations in this guide, developers can quickly deploy a reliable dual-arm robotic platform for experimentation and application development.

FAQ

Q1:Why does the follower arm move suddenly when leader-follower mode is enabled?
When leader-follower mode is activated, the follower arm immediately attempts to match the current pose of the leader arm.
If the two arms start from significantly different positions, the follower arm may perform a rapid corrective movement.
Q2:The follower arm is not following the leader arm. What should I check first?
Verify the following items:
- CAN H and CAN L are connected correctly.
- Leader and follower modes are configured properly.
- Configuration settings have been saved.
- The CAN cable is firmly connected.
- Both robot arms are running compatible software versions.
In most cases, incorrect CAN wiring or unsaved configuration parameters are the root causes.
Q3:Why does the follower arm stop responding after working correctly for a period of time?
This behavior is typically caused by:
- Loose CAN connectors
- Unstable power supply
- CAN bus communication interruptions
- Software configuration changes
Check cable integrity, power stability, and communication status before restarting the system.
Q4:What should I do if the follower arm’s motion does not exactly match the leader arm?
Check the following:
- Joint calibration status
- Home position accuracy
- Mechanical interference
- Firmware version consistency
- CAN communication quality
Small tracking errors can often be reduced by recalibrating both robot arms and ensuring they start from similar initial poses.
 Have Question?
If you encounter any issues with environment installation, parameter configuration, or RL training, feel free to leave your questions for further discussion.
3 posts - 2 participants
ROS Industrial: ros2_canopen: Natively Integrating CANopen Devices into the ROS 2 Ecosystem
CANopen has long been one of the most widely used communication standards in industrial automation. Built on top of the CAN bus and standardised by CAN in Automation (CiA), it connects motor drives, I/O modules, sensors and other field devices across machines, robots and vehicles. The ros2_canopen stack, maintained under the ROS-Industrial umbrella, brings this ecosystem natively into ROS 2. It lets developers describe a CAN bus, bring up a CANopen master, and talk to every device on the bus through standard ROS 2 nodes, services, topics and ros2_control interfaces.
Built on the lely-core from Lely Industries N.V.
Rather than reimplementing the CANopen protocol, ros2_canopen builds on lely-core, the professional, open-source CANopen library from Lely Industries N.V. lely-core handles the demanding low-level work: the CANopen event loop, NMT state management, SDO and PDO communication, and a configuration toolchain that turns a human-readable bus description into the device configuration files (DCF) the master needs at runtime.
Basic capability
At the heart of the stack is a device container that reads a single YAML bus description. In that file you declare each node on the bus (its node ID, its EDS file, and the driver to load for it) together with any parameters that override the device defaults. From that one description, the container launches the CANopen master and the per-device drivers.
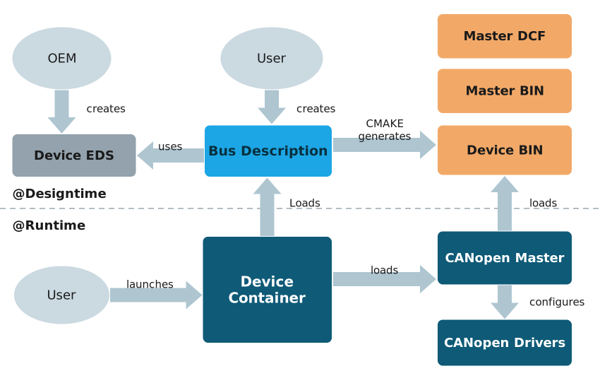
To accommodate a wide range of industrial use cases, ros2_canopen offers three flexible operation modes depending on your application's requirements:
- Standard ROS 2 Nodes: Best for simple setups. Each CANopen device is run as a standard ROS 2 node, communicating through basic topics and services.
- Managed Lifecycle Nodes: Adds system reliability and recovery. Devices are wrapped as lifecycle nodes, allowing a manager to bring the entire CAN bus online or offline in a precise, safe sequence.
ros2_controlIntegration: Built for high-performance and low-latency control. This mode exposes CANopen devices directly as hardware interfaces for the broader ROS 2 control framework.
To interface with your hardware, the stack provides two primary drivers out of the box:
- The Proxy Driver: A generic bridge that forwards raw CANopen messages (such as SDOs and PDOs) to and from ROS 2. It is perfect for custom sensors, debugging, or devices without a standardized profile.
- The CiA 402 Driver: A specialized motion-control driver that implements the industry-standard profile for motor drives and servo controllers, allowing you to command positions, velocities, and torques natively.
New feature: Multi-drive systems
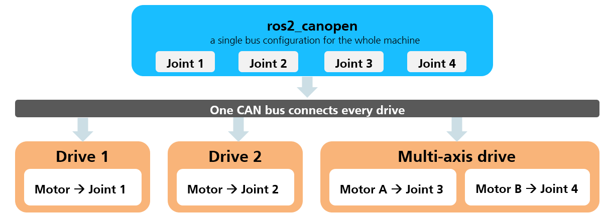
Multi-drive coordination has become a particular focus of the project's recent development. The stack has always been able to run several drives on a single bus, each as its own CANopen node sharing one master, with the CiA 402 driver providing the full motion-control profile: control and status words, profiled and cyclic position, velocity and torque modes, and interpolated position mode. Every node is configured independently in the bus description, with its own PDO mappings and unit-scaling factors.
The most recent releases added CiA 402 multi-channel support, which lets a single CANopen node expose more than one drive axis. Many modern servo controllers pack two or more axes behind a single node, and the driver now maps each axis to its own channel, with its own state machine and operation mode, so each can be commanded individually. Together with the existing multi-node setup, the stack now covers both ways of building a multi-drive system.
Behind the scenes, the CANopen master automatically coordinates all communication. It manages the flow of commands so you can control multiple motor axes simultaneously without worrying about network conflicts. It also keeps the motors perfectly synchronized, which is essential when multiple joints must move in harmony.
On the ROS 2 side, the stack groups these individual drives together and presents them to the system as a single, unified robot. Each motor axis is mapped directly to a standard robot joint. As a result, you can control your entire multi-axis machine using familiar ROS 2 controllers and visualize its movement in RViz just like any other robot.
Acknowledgments
the ros2_canopen stack provides a robust, modern, and highly flexible framework for integrating industrial CANopen devices into the ROS 2 ecosystem. By leveraging a reliable open-source CANopen engine and integrating tightly with ros2_control, it lowers the barrier to building and controlling complex multi-drive robot systems.
This progress is a true community effort. A huge thank you goes to all the contributing developers and partner organizations whose dedication has shaped the core architecture, hardware interface capabilities, and testing infrastructure. We are particularly grateful for the community-contributed CiA 402 multi-channel support, which has made orchestrating multi-axis drives easier than ever.
To explore the codebase, report issues, or contribute to the project, check out the official https://github.com/ros-industrial/ros2_canopen
ROS Discourse General: Offboard Control with PX4 & ROS 2 (Micro XRCE-DDS)
I wanted to share an architectural pattern for handling autonomous drone navigation using ROS 2 (Jazzy) and PX4 Autopilot via Micro XRCE-DDS, specifically regarding the Offboard mode failsafe.
The Problem: When developing an autonomous flight node in C++, transitioning to PX4’s Offboard mode can be tricky. PX4 implements a strict failsafe: it will reject any VEHICLE_CMD_DO_SET_MODE to Offboard unless it detects a continuous stream of setpoints (e.g., TrajectorySetpoint and OffboardControlMode) at >2Hz prior to the request.
A common beginner mistake is using while loops with std::this_thread::sleep_for() to pre-load these setpoints. This is an anti-pattern in ROS 2 because it blocks the executor’s thread, preventing the node from processing incoming telemetry from the drone.
The Solution: Instead of blocking the thread, we implemented a non-blocking State Machine driven by the ROS 2 Executor using rclcpp::Node::create_wall_timer.
By setting a timer to fire exactly every 50ms (20Hz), we delegate the time-keeping to the Executor. Inside the timer’s single callback, we manage a state machine that handles the initialization sequence safely:
-
Pre-flight Heartbeat: The callback counts up to 20 cycles (1 second) publishing dummy setpoints to satisfy the PX4 failsafe.
-
Mode Switch: On the 21st cycle, it publishes the Offboard command.
-
Arming: It sends the Arm command.
-
Mission Loop: It continues publishing the actual trajectory setpoints at 20Hz without ever blocking the main thread.
Resources: rclcpp: rclcpp::node::Node Class Reference , Offboard Mode | PX4 User Guide , Create wall timer using callback with parameters.
1 post - 1 participant
ROS Discourse General: Pyspacemouse axis conventions
Thanks to new contributor, we have documentation of, and several options for, axis conventions in pyspacemouse ![]() not yet released to pypi, but please try it out (you can pip install directly from github!) and let me know what you think.
not yet released to pypi, but please try it out (you can pip install directly from github!) and let me know what you think.
Longer term, the plan is to change the default convention to HID, because the LEGACY convention is, frankly, insane, and I don’t want all users to have to “fix it” on their own.
1 post - 1 participant
ROS Discourse General: Guidelines for AI-Assisted Contributions in the ROS Project
Hello fellow ROS users, maintainers, contributors and anyone else who may be passing by.
Due to a recent uptick in LLM-authored pull requests, the ROS PMC has elected to extend the upstream OSRF policy on the use of generative tools to help provide some boundaries/guidelines on the use of these tools. These tools and technologies are constantly changing, so this isn’t intended to serve as a permanent policy, but rather it is to provide a framework for how to interact on ROS-related projects.
The TLDR, because there are a lot of words below: Feel free to use the tools to build, explore, and understand software (as many of the maintainers also do), but when it comes time to interact on Discourse, Zulip, or Github, try to leave the LLM-centric text behind. A large component of open source software is about building/collaborating with people, and we would generally prefer to interact with people rather than an LLM-proxy.
Maintainer time is a finite and constrained resource. While generative AI tools can be useful development assistants, submitting unverified Large Language Model (LLM) output shifts the engineering, debugging, and verification work onto project maintainers.
This document establishes the rules for interacting with ROS project repositories when using AI tools. It serves as an extension of the upstream OSRF Policy on the Use of Generative Tools in Contributions. While the upstream policy defines the legal, IP, and attribution requirements for AI-generated code, these rules define the quality and behavioral standards required to protect maintainer bandwidth.
The Author Ownership Rule
The upstream OSRF policy states that contributors must have the right to sign the Developer Certificate of Origin (DCO). Operationally, this means you are the sole owner of, and are fully responsible for, the code you submit.
-
Do not use maintainers as an LLM validation service. If a maintainer points out a bug, architectural issue, or syntax error in your PR, you may not simply paste that feedback back into an LLM and copy-paste the unverified output as a response.
-
You must understand every line of code you submit. If a maintainer asks why a specific technical choice was made, responding with “an LLM generated this” or providing a generic, AI-synthesized explanation is unacceptable. You must be able to defend the technical merits of your implementation yourself.
-
Maintainers want to engage with you, the author of the proposed changes. Maintainers want to understand why you want to make the change and why you want to implement it the way the PR proposes. Maintainers do not want to talk to your chatbot.
Zero-Tolerance for Hallucinated API/Dependency Usage
LLMs frequently hallucinate APIs, configuration parameters, or entire library features, especially given the fast-moving nature of ROS releases and underlying middleware (DDS, Zenoh, rclcpp, rclpy, etc.).
-
Any PR that introduces non-existent APIs, impossible configuration keys, or broken logic due to LLM hallucinations will be closed immediately without review.
-
Repeat offenses will result in a temporary or permanent block from the organization’s repositories.
Compliance with Upstream Disclosure & Attribution
The upstream OSRF policy explicitly requires that the use of generative tools be disclosed if they created a material part of the contribution. We enforce this strictly on GitHub:
-
If an LLM was used to generate structural code, tests, or documentation boilerplate, state it clearly in the PR description.
-
Do not LLM dump to generate your PR description. Paragraphs filled with generic AI phrasing (e.g., “This PR enhances the efficiency of the codebase by utilizing modern design patterns and optimizing asynchronous paradigms…”) will be rejected. Write a concise, human-authored summary explaining exactly what changed and why.
Enforcement and Maintainer Recourse
To maintain the health of the project, maintainers have full discretion to handle low-effort, AI-driven contributions efficiently:
-
If an issue or PR is clearly an unverified LLM dump (e.g., containing generic AI comments, formatting that violates project style guides, contains a poorly formatted description pasted directly from an LLM, or obviously broken logic), maintainers are authorized to close the PR immediately.
-
If a contributor responds to code review feedback using obvious, unedited LLM-generated text that fails to address the underlying engineering critique, maintainers are authorized to close the PR immediately.
-
If the contributor fails to respond to reviewer questions or feedback within a reasonable timeframe (e.g. within a week), reviewers may close the PR without further review.
-
If a contributor continues to behave in an unproductive way through repeated submission of inappropriate LLM-dump issues or PRs, repeated copy-and-pasting of LLM-dump comments, or similar, maintainers are authorized to temporarily or permanently block that user from the organization’s repositories.
Guidelines for Responsible AI Use in ROS
If you want to use an LLM to help you successfully contribute to ROS, adhere to the following workflow:
-
Confirm that the issue is still valid and that any proposed solution is still preferred. Start a conversation on the issue thread to ensure maintainers agree with the approach. Opening PRs for stale or invalid issues simply because an AI bot identified them creates unnecessary overhead for maintainers and is strongly discouraged.
-
Run the code locally. Verify it compiles, passes linting, and passes all relevant tests before opening a PR.
-
Before hitting “Submit,” read through your own diff line-by-line. Remove any redundant logic, overly verbose AI-generated comments, or structural weirdness introduced by the model.
-
Explain your changes in plain technical language. If you can’t describe the change yourself, you aren’t ready to submit it.
16 posts - 10 participants
ROS Discourse General: Logging and Observability Guide Review | Cloud Robotics WG Meeting 2026-07-13
The group is not meeting today (2026-06-29) due to lack of available members!
Please come and join us for this coming meeting at Mon, Jul 13, 2026 4:00 PM UTC→Mon, Jul 13, 2026 5:00 PM UTC, where we will be editing the first draft of the Logging and Observability guide, generated by AI. The AI used the skeleton of the guide from the previous session and transcripts from all meeting recordings to generate a guide. The group will edit this starting point together in the coming session.
Please note: as this session will be a lot of reading and editing, the group does not plan to record the session.
Last session, we created the skeleton for the guide above, as we have been discussing Logging and Observability tips and best practices over the course of several months. Once the guide has been fully written, previous guest speakers will be invited to review it before it’s published. If you’re interested in watching the previous session, the meeting recording is available on YouTube.
The meeting link for next meeting is here, and you can sign up to our calendar or our Google Group for meeting notifications or keep an eye on the Cloud Robotics Hub.
Hopefully we will see you there!
1 post - 1 participant
ROS Discourse General: A Standard Interface from LLM to Robot Actions
Hi ROS community,
I’m working on ClawsJoy Robotics, a proposal for a standard interface between LLM-based cognitive systems and ROS/2 robots. The core idea: any LLM outputs an action, any robot implements these standard topics.
The Problem
Every robotics company maps “pick up the cup” to different ROS/2 interfaces:
-
Company A: custom service
/manipulation/pick -
Company B: action server
/grasp_object -
Company C: proprietary SDK
There’s no standard way for an LLM agent to tell a robot what to do.
The Proposal: 12 Standard Motion Primitives
navigate_to → /base/cmd_vel (geometry_msgs/Twist)
move_arm → /arm/joint_trajectory (trajectory_msgs/JointTrajectory)
move_base → /base/cmd_vel (geometry_msgs/Twist)
grasp → /gripper/command (std_msgs/Float32, 0=close 1=open)
release → /gripper/command (std_msgs/Float32)
push → /base/cmd_vel (geometry_msgs/Twist)
look_at → camera PTZ control
detect_objects → /perception/objects (vision_msgs/Detection3DArray)
get_pose → /base/odom + /arm/joint_states
speak → /speech/tts (std_msgs/String)
play_gesture → /arm/joint_trajectory (pre-defined trajectories)
wait → no topic (sleep)
emergency_stop → /safety/estop (std_msgs/Bool)
Demo Output
Natural language → task execution (mock mode):
[Result]: ![]() Task completed in 6 steps
Task completed in 6 steps
▸ look_at → table
▸ detect_objects → cup detected
▸ navigate_to → table
▸ move_arm → grasp position
▸ grasp → cup_01
▸ speak → “已拿到水杯” (cup fetched)
[Result]: ![]() Task completed in 6 steps
Task completed in 6 steps
▸ navigate_to → waypoint_1
▸ look_at → front
▸ speak → “waypoint_1 clear”
▸ navigate_to → waypoint_2
▸ look_at → left
▸ speak → “waypoint_2 clear”
Integration Checklist
To integrate a robot with ClawsJoy Robotics:
-
Arm: publish
/arm/joint_states, subscribe/arm/joint_trajectory -
Gripper: subscribe
/gripper/command(Float32, 0=close 1=open) -
Base: subscribe
/base/cmd_vel, publish/base/odom -
Camera: publish
/camera/rgb,/camera/depth -
Perception: publish
/perception/objects -
Speech: subscribe
/speech/tts -
Safety: subscribe
/safety/estop
Then set mock_mode=False and run.
Code
https://github.com/your-org/clawsjoy_robotics
12 primitives defined in motion_primitives.yaml. Full topic mapping in bridge/ros2_bridge.py. Task planner in planner/planner.py.
Questions for the community
-
Are these 12 primitives sufficient, or should we add/remove some?
-
Is
trajectory_msgs/JointTrajectorythe right interface formove_arm, or should we use ROS/2 Actions? -
Should we adopt the existing
ros2_controlinterfaces instead of defining new topics? -
Is this worth standardizing, or is every robot too different?
Looking forward to feedback.
5 posts - 2 participants
ROS Discourse General: Cad to urdf conversion
If you’re a robotics engineer, you’ve probably lost hours to URDF generation.
Not because the robot is complex but because the tooling is.
Renaming mates. Fixing joint axes. Recreating reference frames. Starting over because the CAD came from the “wrong” software.
I got tired of that workflow, so I built Jointly.
Upload a STEP assembly then get a draft URDF with inferred joints, inertia, collision meshes, and a live 3D preview.
It’s not magic , you’ll still review the result. But it turns hours of manual work into a couple of minutes.
I’d love to test it on real-world assemblies. If you have a CAD file that breaks your current exporter, Try it Now
5 posts - 3 participants
ROS Discourse General: Ros2-dev-suite, a StudioCode extension
As shared in a lightning talk at ROSConFr: I have finally completed and “clauded” a comprehensive VS Code extension for ROS 2 development: a unified explorer, live parameter tuner, service/topic/action caller, log viewer, and syntax highlighting for interface files.
My favorite features of the extension, among others:
- Dynamically changing node ROS parameters at runtime via a YAML panel and comparing live params vs. edits: very handy for tuning PIDs, covariances, etc. Possibility to edit an existing params yaml file, inject missing parameters or view the all available parameters
- Displaying the logs of a namespace-filtered node in the output section of the IDE: useful while tuning a single set of nodes whose logs would otherwise be lost in a single launch command.
- Sending topics, services, or actions at runtime with predefined templates and QoS definitions.
- … plenty of others! I invite you to test it or check out the README section.
The main structure of the package is quite simple: usual ROS 2 CLIs are used in virtual shells to perform the functions, so no rclpy dependencies are required.
Available on:
GitHub (to install locally from the .vsix file, and for developers to edit, compile, etc.): GitHub - Tanneguydv/ros2-dev-suite: A comprehensive VS Code extension for ROS 2 development · GitHub
Visual Studio Marketplace (to directly install the extension from the IDE): ROS 2 Dev Suite - Visual Studio Marketplace
This package is a child of GitHub - ErickKramer/nvim-ros2: nvim-ros2 is a simple lua plugin that adds useful features to enhance your development workflow while developing ROS 2 modules. · GitHub , incorporating the latest pull request by Thibault Cozic for workspace navigation, ROS 2 tuner, etc. As I do not use Neovim, these features have been adapted to VS Code.
Some Screenshots:
Parameter tuning

Topic sender

Action caller

Service caller and yaml details (on mouse contextual window)

Logging filter for Output section of IDE

Dedicated notification of selected dying node

Filter left panel display by namespace

1 post - 1 participant
ROS Discourse General: 🍺 ros2-jazzy is now available on Homebrew!
All three ROS 2 distros are now native on Homebrew-macOS:
brew tap idesign0/ros2
brew install ros2-humble
brew install ros2-jazzy
brew install ros2-kilted
One tap to get ROS 2 Jazzy with full simulation and robotics stack support:
![]() Gazebo (gz-sim8) — Gazebo Harmonic simulation out of the box
Gazebo (gz-sim8) — Gazebo Harmonic simulation out of the box
![]() ros2_control — Hardware abstraction & controllers
ros2_control — Hardware abstraction & controllers
![]() MoveIt 2 — Motion planning
MoveIt 2 — Motion planning
![]() Nav2 — Autonomous navigation
Nav2 — Autonomous navigation
No Docker. No VMs. Native macOS.
And the best part? These aren’t one-time snapshots — they stay in sync with upstream and will keep getting updated as the ecosystem evolves. ![]()
What’s next? I’ve been quietly collecting -Werror flag failures from Apple Clang across all three distros. Fixing them upstream should meaningfully improve code quality across the stack.
Want to try MoveIt 2 or TurtleBot4 tutorials on macOS? I’ve patched them for all available distros:
![]() TurtleBot4 tutorials (Jazzy): https://lnkd.in/e2ZXMXBn
TurtleBot4 tutorials (Jazzy): https://lnkd.in/e2ZXMXBn
![]() MoveIt 2 tutorials (Jazzy): https://lnkd.in/eWwNCT-G
MoveIt 2 tutorials (Jazzy): https://lnkd.in/eWwNCT-G
Project Links:
Ros2_macos repo: https://lnkd.in/ehEtTSJz
Homebrew repo: https://lnkd.in/ek5zDAQB
2 posts - 2 participants
ROS Discourse General: Sony AI's Ace (Nature cover, beat a pro table tennis player) — running on ROS 2
Can you believe this is running ROS 2? ![]()
Sony’s Ace Robot Beats Top Table Tennis Pros in Real Matches
Sony AI’s Ace just landed on the cover of Nature — the first robot ever to beat a professional table tennis player.
Let that sink in for a second:
• It tracks a ball moving at 20 m/s with spin over 9,000 rpm
• Perceives it in 10.2 ms (event-based vision)
• Decides and swings on a 1 kHz control loop
• And returns the ball at up to 19.6 m/s
This is physical AI right at the edge of what’s possible — and we’ve been working on the ROS 2 integration and support underneath it. The fact that ROS 2 holds up in a system this demanding says a lot about where the ecosystem is heading.
Huge respect to the Sony AI team. Take a look ![]()
11 posts - 6 participants
ROS Discourse General: A tutorial to make your quadruped robot on ROS
Hello guys !
I made a tutorial to make your own quadruped using ros2 jazzy !
If you have any feed back I am happy to hear it
1 post - 1 participant
ROS Discourse General: Rclnodejs 2.1: Native ESM for a Web-Native ROS 2 SDK
Hi all,
rclnodejs 2.1.0 is out — and it’s a step toward making rclnodejs a web-native SDK for ROS 2: a platform for bringing ROS 2 to the browser and the modern JavaScript ecosystem. With 2.1.0, the whole package is now native ESM, so building web dashboards, teleop UIs, and browser bridges on ROS 2 feels native to today’s web tooling — with the full ROS 2 runtime still underneath whenever you need real nodes.
TL;DR — 2.1.0 makes rclnodejs native ESM end-to-end.
import rclnodejs from 'rclnodejs'just works, the browser SDK (rclnodejs/web) brings ROS 2 to the web, and existingrequire()nodes keep running untouched — the full ROS 2 runtime is still underneath.
 A web-native SDK for ROS 2
- ROS 2 on the web — reach ROS 2 from a web page with
rclnodejs/web: typed APIs over WebSocket, no proxy, no codegen. - Native ESM — first-class
importand top-levelawait, ready for Vite/esbuild and the modern web toolchain. - Full ROS 2 runtime underneath — real nodes, pub/sub, services, actions, parameters, lifecycle, whenever you need them.
- Backward compatible — every existing CommonJS (
require) project upgrades with zero code changes.
 One package, both module systems
// Modern Node / browser — ESM
import rclnodejs from 'rclnodejs';        // full ROS 2 node API
import { connect } from 'rclnodejs/web';  // typed browser SDK
// Existing CommonJS nodes — unchanged
const rclnodejs = require('rclnodejs');
 Where this is heading
Each release moves rclnodejs one step closer to a typed, web-native way into ROS 2:
- 2.0.0
 — a typed browser SDK (
rclnodejs/web) backed by a capability runtime that exposes only whatweb.jsondeclares, with HTTPcall/publishfor non-JS clients. - 2.1.0
 — native ESM across the whole package, so rclnodejs sits naturally alongside the rest of your web stack.
The arc: from “a Node.js client that happens to run in browsers” → “a typed, allow-listed Web SDK for ROS 2”
 Try it
npm i rclnodejs
 SDK guide:
 web/README.md- JS demo (no toolchain):
demo/web/javascript/  TS + Vite demo:
 demo/web/typescript/
Feedback welcome — especially from anyone wiring ROS 2 into web frontends. ![]()
Cheers,
Minggang
1 post - 1 participant
ROS Discourse General: Anomaly Detection. Beta testers wanted
Hi, I used to work at a robotics startup that built robotic dishwashers. (https://armstrong.ai/) And part of my job was to set up diagnostics, monitoring and alerting.
Aside from not being the most interesting part of my job, it was just plain tedious to manually set (and continually tune) thresholds for various signals, topics, etc. I frequently thought it would be nice to have a system that would automate that part of my job and now that the company has closed, I built it.
Now I have reached the point where the useful next step is real robots. The system performs well on recorded public datasets and on some production infrastructure (see below), but what I do not have yet is enough hours on a variety of real robots, doing real work.
Details are here at the Transitive Robotics website:
What it is
The system watches your robot’s topics and tells you when something is wrong. No threshold tuning, no hardcoded rules. It learns what normal looks like on your robot, then flags and reports anomalies in real time.
How to get involved
Reply to this thread or email shane@targetnode.ai. I will help you get it installed and monitored.
What you get and what I am asking for
What you get:
-
Anomaly detection for free on your robot with no manual threshold tuning to maintain.
-
Direct influence over the direction of the system/project. I want to know what is missing, what is confusing, and what breaks on real robots in production.
What I am asking for:
- Honest and detailed feedback
Where it has been tested
I evaluated the system against public datasets that cover real hardware faults across very different platforms. The system has been tested successfully on the following datasets:
-
CASPER. A UR3e collaborative robot arm with real IMU fault data, from Cardiff University. (paper)
-
PADRE, Parrot Bebop 2. Real propeller damage on a quadrotor, recorded from onboard IMUs. (paper)
-
PADRE, 3DR Solo. Real propeller damage on a second quadrotor airframe, with IMU and barometer data.
-
ALFA. A CarbonZ T-28 fixed-wing aircraft with real engine and actuator faults, from Carnegie Mellon University’s AirLab. (data)
-
UAV-SEAD. A large set of real PX4 flights with naturally occurring state-estimation anomalies, from Istanbul Technical University. (paper)
Additionally, I am running the system on my production servers. They are not robots, per se, but they are live production systems that get used every day. Right now the system is watching CPU, memory, disk/network operations (29 signals total) all without me setting or tuning thresholds. In the last 200 hours of operation (since Tuesday, June 16, 2026) there have been no false alerts.
Thanks for checking out this post and if you have any questions, reach out to me at shane@targetnode.ai
2 posts - 2 participants
ROS Discourse General: VL53L0X Time-of-Flight sensor as a Nav2 obstacle layer (ESP32 + ROS 2 Humble)

Sharing a small open-source project that integrates a low-cost VL53L0X Time-of-Flight sensor into the Nav2 costmap as an obstacle source, in case it’s useful to anyone working with cheap range sensors on small robots.
Pipeline
VL53L0X --I2C–> ESP32 --USB serial–> serial_bridge → sensor_msgs/Range
→ tof_to_scan → sensor_msgs/LaserScan → nav2_costmap_2d::ObstacleLayer
What’s included
- ESP32 firmware (Arduino, Pololu VL53L0X library) streaming distance over serial with sensor-disconnect recovery
- An rclpy serial-bridge node publishing sensor_msgs/Range, with a threaded reader and automatic serial reconnect
- A Range → LaserScan converter that synthesizes a configurable narrow fan from the single beam (default ±0.15 rad, 31 rays), emitting +inf for out-of-range readings so the obstacle layer can raytrace-clear
- A full Nav2 costmap config wiring the scan into local and global costmaps (marking + clearing, inf_is_valid: true)
- RViz config and a troubleshooting guide
Built and tested on ROS 2 Humble / Ubuntu 22.04. Python packages (ament_python).
Scope / limitations (up front)
This is a supplementary obstacle sensor, not a LiDAR replacement — a single narrow-FOV ToF sees one thin cone.
One thing I’d be curious about others’ experience on: raytrace clearing on a stationary base leaves residual cells at the edges of the cone, since the clearing rays never cross them. It resolves once the robot moves and the cone sweeps, but I’d be interested whether anyone has handled static-case clearing for single-beam sensors more elegantly. Widening the FOV and increasing ray count helped, but felt like a workaround.
A config gotcha that may save someone time: obstacle marking worked but clearing silently didn’t, until I set obstacle_max_range < raytrace_max_range, with raytrace_max_range equal to the sensor’s true range_max. A mismatch there breaks clearing while marking still functions, so it presents as “obstacles never disappear.”
Feedback and suggestions welcome.
5 posts - 4 participants
ROS Discourse General: Embeddable React telemetry components — a browser ground station for MAVROS
I maintain Altara, a set of MIT-licensed React components for real-time robotics telemetry (PFD, moving map, gauges, event log), and I wrote up building a small drone ground station with them that talks to MAVROS over rosbridge.
The thing I was trying to solve: I wanted a status dashboard our team could open in a browser tab and drop into our own app, rather than running a separate native GCS. So the components are embeddable and themeable rather than a standalone tool.
Writeup (the rosbridge/MAVROS wiring is the interesting part): [ Building a real-time drone ground control station in React - DEV Community ]
Live demo: [ Altara Demo ] · Source: [https://github.com/JayaSaiKishanChapparam/altara\]
If you’ve built browser dashboards for a ROS2 stack, I’d like to know what you ended up reading off your topics, and where existing tools forced you into a standalone app when you wanted something embedded.
4 posts - 2 participants
ROS Discourse General: KRS Unleashed: Easier Hardware Acceleration Prototyping on FPGA
Hey All,
I want to present KRS Unleashed, the tool I am now developing/refactoring/extending since 1 year as part of my PhD.
Some of you might still know KRS (short for Kria Robotic Stack as originally developed by Xilinx/AMD for their Kria platform) as the toolchain developed until 2023 by the ROS 2 Hardware Acceleration Working Group · GitHub .
(Short Summary for those who don’t)
It was a proof-of-concept framework that allowed to synthesize bitstreams, create a sysroot and cross-compile application against it to create robotics applications running on KV260, KR260 (and also claimed jetson, Ultra96v2,.. but i have never tested/verified that so far). So basically the main point of it is to replace this “docker container to compile” flow with ROS 2 colcon mixin and in parallel integrate all the necessary and optional things for hardware acceleration like sysroot creation or vendor-driven bitstream synthesis in a ROS 2 command.
The flow works, but I found it really hard to use:
- long build times whenever you cleaned your build/install folders, as even the sysroot and bitstream needed to resynthesize when you just changed a variable in a package (if you know what you are doing you can keep the untouched compiled packages but its not really stable nor trivial)
- cross-references and dependency cycles made it hard to change configuration like different Vitis version, other firmware OS,..
- hard to understand what each package actually did and which ones were necessary for your task - the original guide simply copied all available packages in
Basically it wasn’t really fun to use and whenever you start with a new project, you fight cmake configurations for a while until you can start coding..
My tool refactored these individual components into 3 separate logical workspaces:
- os → for firmware and sysroot creation - allows to reuse across projects (save lots of memory space, no rebuild necessary, parallel development possible by different team)
- vitis → vendor-driven toolchain necessary to automate your “accelerator bitstream flow”. I refactored also the automation into a nice Python CLI scripted way such that I can also use the Vitis workspace and manually adjust things, but this is more a FPGA developer nice-to-have. Could also be replaced with a flow for other accelerators
- krs → lightweight integration of firmware via single package, that provides the colcon mixin integration. Further a tracetools-kernels package that allows to trace arbitrary code regions in any ROS 2 application extending ros-tracing.
You can also use any of these components in isolated areas - I use for example also vitis + os for standalone faster iteration on host code variations. It might be a little bit harder to setup for the first time, but I can iterate really fast with it (built times up to 80x faster) and the setup is the same for all projects so once you understand it, its relatively easy and doesn’t require changes all over the project but just in very small, well defined areas.
I also created a Hackster Series for the brave.
I continue to develop it, current public version is still humble but I already have an internal jazzy version which I will release once I published a new paper.
Github: GitHub - TUD-ADS/KRS-Unleashed · GitHub
Hackster Series (5 Parts): 1. Getting Started
Paper: https://ieeexplore.ieee.org/document/11231288/
1 post - 1 participant
