| |
Using the Articulation Models (Python)
Description: In this tutorial, you will create a simple python script that calls ROS services for model fitting and selection. The script will output the estimated model class (like rotational, prismatic, etc.) and the estimated model parameters (like radius of rotation, etc.).Keywords: articulation models, kinematic trajectory, model selection, model fitting, rospy, Python
Tutorial Level: INTERMEDIATE
Contents
Introduction
Articulation models describe the kinematic trajectories of articulated objects, like doors, drawers, and other mechanisms. Such models can be learned online and in real-time, while a robot is pulling a door open. The articulation stack in the ALUFR-ROS-PKG repository provides several functions for fitting, selecting, saving and loading articulation models. In this tutorial, you will create a simple python script that calls ROS services for model fitting and selection. The script will output the estimated model class (like rotational, prismatic, etc.) and the estimated model parameters (like radius of rotation, etc.).
Download and Compile
All we need for this tutorial is the articulation_rviz_plugin and its dependency. We assume that you have already installed the basic components of ROS, checked out the ALUFR-ROS-PKG repository at Google Code.
cd ~/ros
svn co https://alufr-ros-pkg.googlecode.com/svn/trunk alufr-ros-pkg
For compilation, type
rosmake articulation_rviz_plugin
which should build (next to many other things) the RVIZ , the articulation_models and the articulation_rviz_plugin package.
Create a new package
First, let's create a new package that depends on articulation_rviz_plugin. This also provides us with the messages defined in articulation_msgs, and the model selection node defined in articulation_models.
roscreate-pkg test_articulation articulation_rviz_plugin
Create a Python client
Copy and paste the following code to a file named model_selection_client.py. This Python node basically contains two functions: sample_track and main. The first function generates an artificial trajectory of an articulated object of a given type (either rotational or prismatic), and returns it in form of a articulation_msgs/TrackMsg message. The main function creates a service proxy for the model_select service, and repeatedly samples trajectories and passes them on to this service. Finally, it prints the result of model selection to the screen, and publishes a model message that can be visualized for example in rviz.
   1 #!/usr/bin/env python
   2
   3 import roslib; roslib.load_manifest('test_articulation')
   4 import rospy
   5 import numpy
   6
   7 from articulation_msgs.msg import *
   8 from articulation_msgs.srv import *
   9 from geometry_msgs.msg import Pose, Point, Quaternion
  10 from sensor_msgs.msg import ChannelFloat32
  11
  12
  13 PRISMATIC = 0
  14 ROTATIONAL = 1
  15 MODELS={PRISMATIC:'prismatic',ROTATIONAL:'rotational'}
  16
  17 def sample_track(model = PRISMATIC, n = 100, sigma_position = 0.02):
  18         msg = TrackMsg()
  19         msg.header.stamp = rospy.get_rostime()
  20         msg.header.frame_id = "/"
  21         msg.id = model
  22         for i in range(0,n):
  23                 q = i / float(n)
  24                 if model == PRISMATIC:
  25                         pose = Pose(Point(q, 0, 0), Quaternion(0, 0, 0, 1))
  26                 elif model == ROTATIONAL:
  27                         pose = Pose(Point(numpy.sin(q), numpy.cos(q) - 1.0, 0), Quaternion(0, 0, 0, 1))
  28                 else:
  29                         raise NameError("unknown model, cannot generate trajectory!")
  30                 pose.position.x += numpy.random.rand()*sigma_position
  31                 pose.position.y += numpy.random.rand()*sigma_position
  32                 pose.position.z += numpy.random.rand()*sigma_position
  33                 msg.pose.append( pose )
  34         return msg
  35
  36 def main():
  37         rospy.init_node('test_fitting')
  38
  39         model_select = rospy.ServiceProxy('model_select', TrackModelSrv)
  40         model_pub = rospy.Publisher('model', ModelMsg)
  41         print
  42
  43         while True:
  44                 for model_type,model_name in MODELS.items():
  45                         request = TrackModelSrvRequest()
  46                         print "generating track of type '%s'" % model_name
  47                         request.model.track = sample_track( model_type )
  48
  49                         try:
  50                                 response = model_select(request)
  51                                 print "selected model: '%s' (n = %d, log LH = %f)" % (
  52                                         response.model.name,
  53                                         len(response.model.track.pose),
  54                                         [entry.value for entry in response.model.params if entry.name=='loglikelihood'][0]
  55                                 )
  56                                 model_pub.publish(response.model)
  57                         except rospy.ServiceException:
  58                                 print "model selection failed"
  59                                 pass
  60                         if rospy.is_shutdown():
  61                                 exit(0)
  62                         print
  63                         rospy.sleep(0.5)
  64
  65
  66
  67 if __name__ == '__main__':
  68   main()
Create a launch file
Copy and paste the following into a file called model_selection.launch in your current directory.
<launch>

        <node pkg="test_articulation" type="model_selection_client.py" name="test_fitting" output="screen" />

        <node pkg="articulation_models" type="model_learner_srv" name="model_learner_srv" output="screen"/>

        <node pkg="rviz" type="rviz" output="screen" name="rviz" args="-d $(find test_articulation)/fit_models.vcg" />

</launch>
This will bring up the model selection service (offered by the model_learner_srv node from articulation_models). Further, this will start rviz in a configuration that will show the grid, the coordinate axes, the generated trajectory and the model fitted to it. For making this work, download this configuration file fit_models.vcg for RVIZ and save it in the test_articulation folder.
Run the example
Now simply run:
rosmake test_articulation
roslaunch model_selection.launch
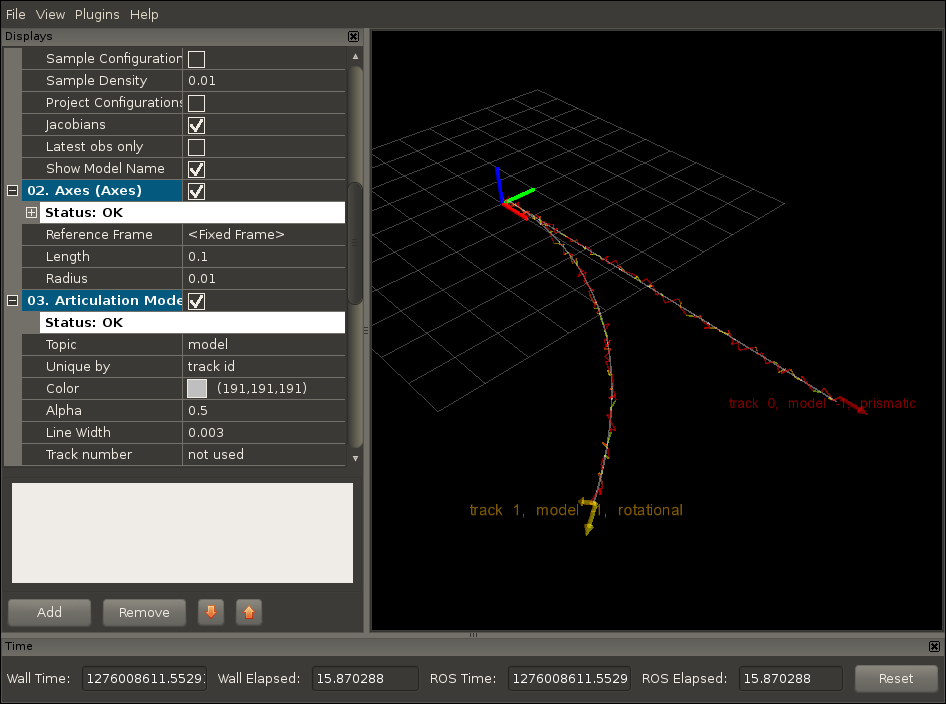
The result should look similar to the following figure.
|
The Python node presented in this tutorial samples trajectories alternately prismatic and rotational models, and runs them through model selection. The track and the fitted model can then both be visualized in RVIZ. |


