| |
How to use a SceneConfigurator-Node
Description: This tutorial shows how to use the basic functionality of a SceneConfigurator-Node through a step by step real scene example of an object configuration setup for further processing.Tutorial Level: BEGINNER
Next Tutorial: How to use the recorder and How to use the recognizer
Contents
Command overview
Shortcut |
Description |
m |
Switch the PROCESSING_MODE between All Objects and Only Marked Objects (see State Overview below) |
space |
Switch the STATUS between Auto Processing and Manual Processing (see State Overview below) |
enter |
Process the object configuration which was arranged with the SceneConfigurator. The way of processing the configuration is implemented by the actual node e.g. the recorder writes a configuration into a database. |
delete or backspace |
Reset all objects gathered in an object configuration and buffered (old) object estimation. The result is an empty object configuration. |
a |
Add objects from current view to marked objects*. |
d |
Remove objects in the current view from marked objects*. |
u |
Update view to get rid of buffered (old) object estimations, because the only other triggers for clearing this estimations is the SceneConfigurator while in Auto Processing State (see State Overview below), reset of all objects or the movement of the object detector e.g. a camera mounted on a mobile service robot. This command can become very handy especially when working with an virtual object detector or generally with an fixed object detector. |
s |
Print a color coded list of objects that are part of the current object configuration. |
h |
Print a help text, but actually it just prints the state and command overview anew. |
ctrl + c |
Quit the node |
*view and marked objects are descripted in the Object State chapter.
State Overview
SceneConfigurator state
STATUS |
|
Manual Processing |
In this state further processing of an object configuration has to be called explicitly from the user with an keyboard command and only in this state it is possible to setup a scene configuration by keyboard commands. |
Auto Processing |
In this state further processing of an object configuration will be called in the predefined interval “capture_interval“. |
PROCESSING_MODE |
|
All Object |
In this mode all objects derived from incoming object estimations considered as part of the object configuration. |
Only Marked Objects |
In this mode only marked objects will be considered as part of the object configuration. The different states of objects an the benefits of such an approach is described below. |
Object state

Picture 1: Color highlighting of the different object states.
Left: (yellow) unmarked Object in current view.
Middle: (green) marked Object in current view.
Right: (blue) marked object not in current view.
State of an object consist of two properties first if the object is in the current view and second if the object is marked. View is an terminus derived from the actual application of an object detector with an camera setup. So “an object in the current view” means that an object was detected in the current camera view and as result the SceneConfigurator received an new object estimation. Likewise you could say that if the SceneConfigurator doesn't receive a new estimation to an specific object this object is not in the view. Marked Objects on the other hand have to be explicitly marked and unmarked by the user and indicate that this objects should be considered as part of the object configuration also if it is not in the view right now.
The main reason to mark objects is that if an object get out of view because the detector moved, the SceneConfigurator still keep the last object estimation about this object. This approach enables to process much larger configurations or spatial scattered configurations which can't be captured by a single camera view. Another benefit of this approach is that we can use marked objects as filter for incoming object estimations, because we can mark all objects we consider as part of the object configuration and just accept marked objects.
Setup
Make sure an object estimation source is running, e.g. an object detector (asr_descriptor_surface_based_recognition, asr_aruco_marker_recognition, etc.) or asr_ism's own object source fake_data_publisher.
- Set parameters of the configurator for your own needs, but generally the default parameters are just fine:
param/capturing.yaml:
Parameter |
Description |
Type |
Default |
objectTopic |
The topic the node is listening to for new object estimations of observed objects in a scene. |
string |
/stereo/object |
capture_interval |
The interval in which a object configuration is processed, when the node is set to “Auto Processing“. |
double |
3 (sec) |
queueSizePbdObjectCallback |
The queue size for the objectTopic-Subscriber to buffer messages if the processing of new messages (converting from asr_msgs::AsrObject to ISM::Object) is slower as the time for new estimations to arrive. |
int |
100 (msgs) |
object_input_thread_count |
The amount of threads used to process incoming object estimation messages. |
int |
4 (threads) |
use_confidence_from_msg |
Whether to use the confidence from the object messages or just assume perfect object recognition and use confidence 1.0 for every recognized object. |
bool |
false |
enableRotationMode |
Whether the object orientation should be rotated to the baseFrame or to an Object. This only affect rotation invariant objects*. (0: don't rotate; 1: rotate to rotationFrame; 2: rotate to rotationObject) |
int |
1 |
rotationFrame |
Defines the frame to which the objects should be rotated. The rotation only takes place if baseFrame == rotationFrame and enableRotationMode = 1 . This only affect rotation invariant objects*. |
string |
/map |
rotationObjectType |
Defines the object type to which the objects should be rotated. The rotation only takes place if enableRotationMode = 2. This only affect rotation invariant objects*. |
string |
"" |
rotationObjectId |
Defines the object id to which the objects should be rotated. The rotation only takes place if enableRotationMode = 2. This only affect rotation invariant objects*. |
string |
"" |
keyboard_poll_rate |
The rate (Hz) in which the keyboard-thread poll the keyboard for user input. |
int |
10 (Hz) |
input_objects_visualization_topic |
The topic on which the visualization of the SceneConfigurator is published. |
string |
input_objects_ scene_configurator_viz |
enableNeighborhoodEvaluation |
Whether to use neighborhood evaluation** or not. |
bool |
false |
angleNeighbourThreshold |
Maximal angle deviation accepted between two estimations of the same object. Only used if neighborhood evaluation** is enabled. |
double |
30 (degree) |
distanceNeighbourThreshold |
Maximal distance accepted between two estimations of the same object. Only used if neighborhood evaluation** is enabled. |
double |
0.05 |
*rotation invariant objects are objects that whether or not they are rotated around their own axis you still can't distinguish between differing orientations (e.g. https://en.wikipedia.org/wiki/Solid_of_revolution). In our case it is the y-axis of the object (Y up).
**Neighborhood evaluation: if the poses of two estimations with the same object-type deviate over a certain thresholds, then it can be consider as two different objects.
param/sqlitedb.yaml:
Parameter |
Description |
Type |
Default |
baseFrame |
Frame to which incoming object messages are transformed. This is used to unify their coordinate frames. |
string |
/map |
launch/recognizer.launch (at the moment only this node has the option to set the parameters below to a different value than the default):
Parameter |
Description |
Type |
Default |
ignoreTypes |
Whether to ignore the object type from incoming object estimations and use the empty-String instead. |
bool |
false |
ignoreIds |
Whether to ignore the object id from incoming object estimations and use the empty-String instead. |
bool |
false |
Tutorial
The first step is to get a SceneConfigurator-Node like recorder or recognizer running; therefore you have to use the ROS tool roslaunch from your console, e.g:
roslaunch asr_ism recorder.launch
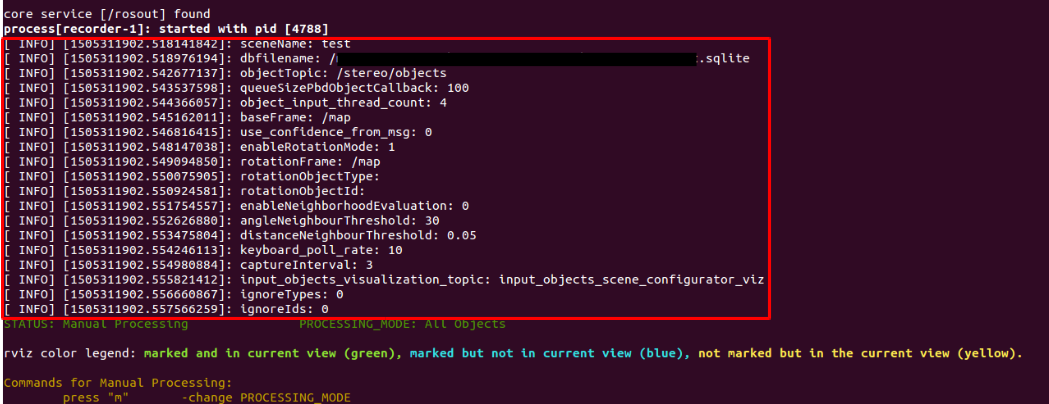
Picture 2: Terminal output after startup with hightlighted parameters.
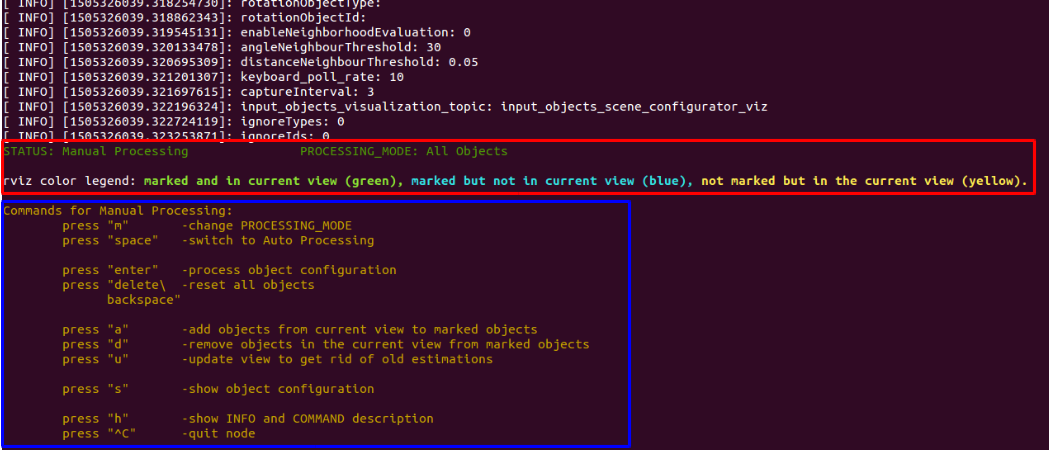
Picture 3: Terminal output after startup with highlighted command overview and SceneConfigurator state information.
After launching the node you will get quite a lot of console output which should be explained: After the general output from roslaunch you will get a list of parameters with the used values (see red block in Picture 2). Right after this you get the state of the node (see red block in Picture 3), which is indicated by STATUS and PROCESSING_MODE (see section State Overview). And additionally a short legend for the colors used to highlight objects in the rviz visualization. Last but not least you get a command overview with short descriptions of each command (see blue block in Picture 3).
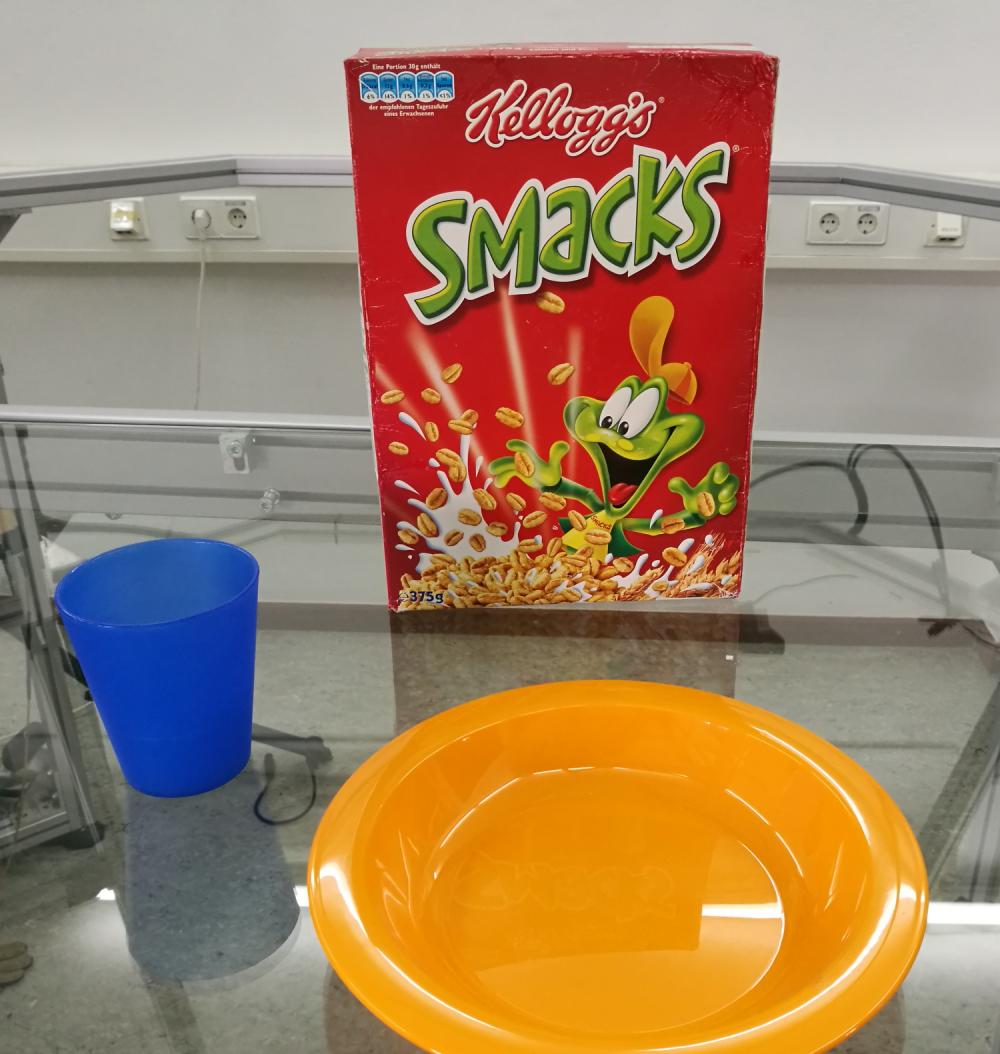
Picture 4: Example breakfast scene.
Now it's time to assemble a scene if not already done. In this tutorial we'll use the breakfast scene shown in Picture 4.

Picture 5: rviz visualization right after startup with terminal output of [s]-command.
The corresponding rviz visualization right after the startup of the SceneConfigurator -Node is shown in Picture 5. The left one shows the visualization of the object detector and at the same time the visualization of the SceneConfigurator, with this approach you can use the SceneConfigurator visualization as an overlay, but for the further tutorial we will only use the highlighted visualization of the SceneConfigurator like on the right visualization. Further to mention is that the red arrows from the object center depict the object's orientation. The terminal excerpt in the middle shows the output after using the [s]-command for showing the current object configuration and each object is listed with type name and id under the dedicated object state. We notice that the color code from the terminal match the color of the visualization and indicates us that these objects are currently visible in our view (this statement is usually right but with customized terminals the colors may vary).

Picture 6: Depicts the result of the [a]-command.
It's best practice to mark objects with the [a]-command (see Picture 6) if these objects should be part of the configuration which we want to process, because if they get occluded while changing the scene or we want to change the view, we still keep the last estimation of these objects and achieve less configurations with unintentional missing objects.
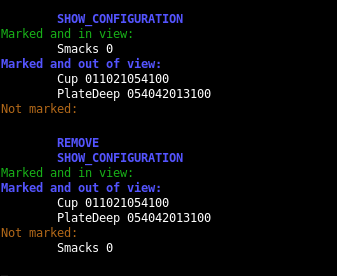
Picture 7
Actually our wanted object configuration is complete and ready to process e.g. by just using the [enter]-command, but let us explore the SceneConfigurator a little further. Lets say we accidentally added the Smacks-box and want to remove it from the marked objects. You can e.g. take the box, hold it into the camera-view and press the [r]-command (see Picture 7). If we place the box back into the camera-view it will just be an unmarked object, but we can still process the object configuration with all three objects like before or we can now also filter unmarked objects by changing the PROCESSING_MODE with the [m]-command (see Picture 8). This leads to more control over the processed object configuration.
Note: If you remove an object physically from the scene or occlude the other objects because you hold an object into the camera like in the above example, then you should press the [u]-command to update the view, because the view only update its content, if the movement of the camera is explicitly registered from the SceneConfigurator over a service call or if the node is set to Auto Processing.

Picture 8
This tutorial should have served as small overview of how to use a SceneConfigurator-Node. For the remaining commands we encourage the user to just try them.
Appendix: Writing a SceneConfigurator-Node
While the above tutorial shows the standard functionality, which can be configured through the listed parameters, this chapter will show the major steps in how to write a SceneConfigurator-Node and expand the functionality.
The SceneConfigurator-Class uses boost::function in the following three types to further customize the behavior.
typedef boost::function<void(ISM::ObjectSetPtr)> ProcessConfigurationFunction;
typedef boost::function<void(int)> ProcessKeyboardInputFunction;
typedef boost::function<void(ISM::ObjectPtr)> ProcessObjectInputFunction;
A boost::function can simply be described as function-wrapper and is easier to use than function-pointers. Your new node has to provide a ProcessConfigurationFunction-function and has to pass it to the SceneConfigurator constructor, while a ProcessKeyboardInputFunction- and a ProcessObjectInputFunction-function is optional. To see how to pass a function it is recommended to use the boost::function documentation or check the recorder- or the recognizer-code.
SceneConfigurator(ProcessConfigurationFunction processConfigFunc, ProcessKeyboardInputFunction processKeyboardInputFunc = ProcessKeyboardInputFunction(), ProcessObjectInputFunction processObjectInputFunc = ProcessObjectInputFunction());
processConfigurationFunc: This function will be called if the [enter]-command is used or call it in a certain interval when Auto Processing. The SceneConfigurator passes the current object configuration as ISM::ObjectSetPtr to this function. The recorder for example use this to store the configuration into a database and the recognizer tries to recognize a scene which matches this configuration.
processKeyboardInputFunc: This function can be used to add further keyboard commands. The SceneConfigurator will pass the keys, which itself don't use, as integer to this function.
processObjectInputFunc: This function will be called if a new object estimation arrives through the objectTopic and this object estimation will be passed as ISM::ObjectPtr to processObjectInputFunc-function.
With the above information you should be able to add the SceneConfigurator functionality to your own nodes.


