| Note: This tutorial assumes that you have completed the previous tutorials: How to set up a Pilz PSENscan laser scanner with Ethernet. |
| |
How to set up ROS to communicate with the scanner
Description: You learn how to set up the PILZ laser scanner with ROS and show the result in Rviz.Keywords: PSENscan, psen_scan
Tutorial Level: BEGINNER
Next Tutorial: Launching multiple scanners
Contents
WARNING
THE PILZ SOFTWARE IS PROVIDED AS-IS AND WITH NO WARRANTY (FOR MORE DETAILS SEE LICENSE).
Introduction
This tutorial teaches you to set up and launch the ROS driver for the PSENscan laser scanner. This includes creating a new ROS package to read and display laser scanner data.
Prerequisites
In order to complete this tutorial, you need the following:
A workstation or a Virtual machine with Ubuntu 18.04 LTS and ROS melodic installed.
Completed the first ROS tutorial create a catkin workspace.
- An operable catkin workspace.
- An installed PSENscan package.
sudo apt update
sudo apt install ros-melodic-psen-scan
Create a ROS package with the required files
Install the psen_scan package as in the previous tutorials described.
In your workspace, create a new package:
cd ~/catkin_ws/src
catkin_create_pkg --rosdistro melodic psen_scan_tutorials psen_scan
cd psen_scan_tutorials
mkdir config
gedit config/scanner_config.yaml
Copy the following content and paste it into gedit. Do not forget to save the new created file.
password: "ac0d68d033"
sensor_ip: "192.168.0.10" # Insert the IP of the laser scanner here.
host_ip: "192.168.0.25" # Change the IP to the IP of your PC.
host_udp_port: 55000
Like in the last step create the file psen_scan_tutorials/launch/psen_scan.launch with the following content by using gedit:
mkdir launch
gedit launch/psen_scan.launch
<launch>
  <node name="laser_scanner" type="psen_scan_node" pkg="psen_scan" output="screen" required="true">
    <rosparam command="load" file="$(find psen_scan_tutorials)/config/scanner_config.yaml" />
  </node>
  <node name="$(anon rviz)" type="rviz" pkg="rviz" args="-d $(find psen_scan)/config/config.rviz" />
</launch>
The code explained:
  <node name="laser_scanner" type="psen_scan_node" pkg="psen_scan" output="screen" required="true">
    <rosparam command="load" file="$(find psen_scan_tutorials)/config/scanner_config.yaml" />
  </node>
This starts the psen_scan_node and loads the newly created config file.
<node name="$(anon rviz)" type="rviz" pkg="rviz" args="-d $(find psen_scan)/config/config.rviz" />
This starts rviz with a predefined configuration.
Required parameters
To launch the ROS driver, the following parameters are mandatory:
password
The password is required to establish communication with the scanner. The password has to be encrypted. The default encrypted value is ac0d68d033.
sensor_ip The IP of the laser scanner in the network. You have configured this in the first tutorial using the configuration tool.
host_ip
The IP under which the scanner can reach your PC and will send UDP packages to. It needs to be in the same subnet as the aforementioned sensor_ip. We suggest setting this IP statically for the appropriate network interface.
host_udp_port
Similar to the host_ip this is used for the scanner to reach your PC. It needs to be accessible by the scanner, so make sure it is not blocked by a firewall and the scanner can reach it.
For an overview of all parameters, please visit https://github.com/PilzDE/psen_scan/blob/melodic-devel/README.md#ros-api
Start the PSENscan application
Now you can launch your newly created launchfile with the following command:
roslaunch psen_scan_tutorials psen_scan.launch
- Make sure your PC operates in the same IP subnet like the laser scanner.
- Make sure to set the IP addresses according the parameters above. The previous tutorial showed how these could be altered.
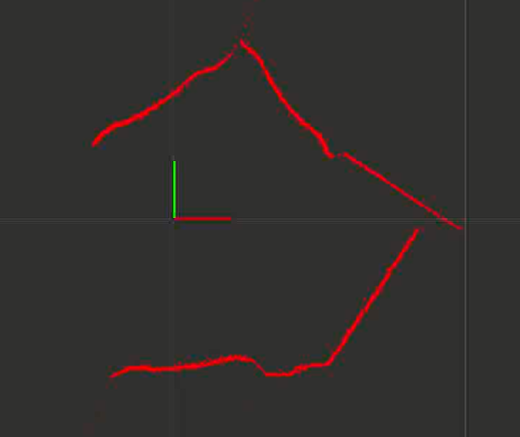
This should launch rviz and look something like this:

The red lines show the detected surroundings of the scanner.
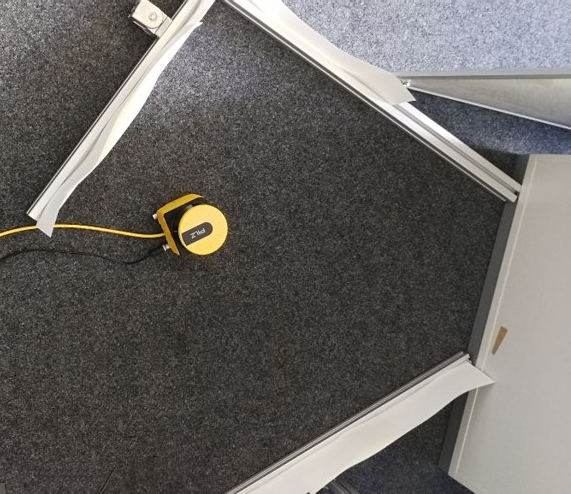
For comparison in reality the scanner was placed in an arrangement more or less like this:

Conclusion
In this tutorial you created a basis for an application using the PSENscan laser scanner together with ROS. In the next tutorial you learn how to connect to multiple scanners.


