| |
BlinkM Tutorial
Description: Control a BlinkM through ROS using an Arduino and rosserialTutorial Level: ADVANCED
Next Tutorial: Arduino Oscilloscope
Show EOL distros:
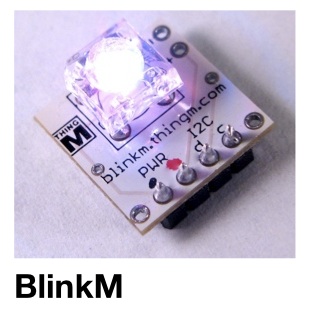
One thing every robot needs is a good indicator light. If you are looking for something more fancy or just plane brighter than just a single tiny LED, the BlinkM is a good choice for your robotics project. The BlinkM is a I2C controlled multi-colored LED which can change colors and run lighting scripts. In this tutorial, we are going to use the default scripts of a BlinkM to create a multicolored blinking or solid indicator light.

For this tutorial, you will be using the example provided with ros_lib. In your Arduino IDE, go to File>Examples>ros_lib>BlinkM. The code can also be found in rosserial_arduino/src/ros_lib/examples.
For a full reference and getting started guide for the BlinkM, see the BlinkM datasheet.
Hardware

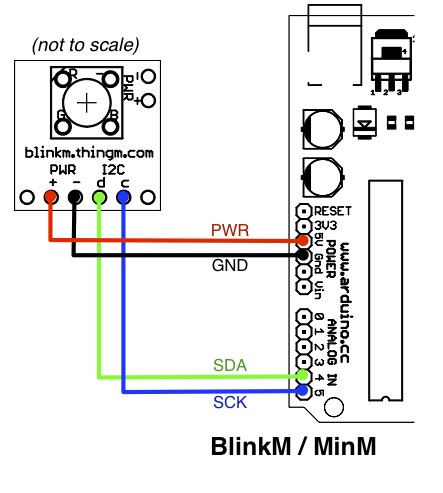
Diagram from the BlinkM datasheet
The hardware for this tutorial is relatively simple. All that is neccesary is a BlinkM and an Arduino. The BlinkM needs to be connected to 5V, GND, and the Arduino's I2C connections (SDA and SCL). You can purchase both a BlinkM and an Arduino from Sparkfun.
Code
The ROS serial integration code for the blinkm is below. In this arduino sketch, the node subscribes to a std_msgs/String on the blinkm topic. In the callback, the the node parses the command to determine the LED's color and if it should be blinking. The LED can be red (r), blue (b), magenta(m), green(g), white(w), cyan(c), and yellow(y). If the command begins with an 'S' or 's' the LED is a solid color. Otherwise, the LED blinks that color.
   1 /*
   2 *  RosSerial BlinkM Example
   3 *  This program shows how to control a blinkm
   4 *  from an arduino using RosSerial
   5 */
   6
   7 #include "WProgram.h" //include the Arduino library
   8 #include <stdlib.h>
   9
  10
  11 #include <ros.h>
  12 #include <std_msgs/String.h>
  13
  14
  15 //include Wire/ twi for the BlinkM
  16 #include <Wire.h>
  17 extern "C" {
  18 #include "utility/twi.h"
  19 }
  20
  21 #include "BlinkM_funcs.h"
  22 const byte blinkm_addr = 0x09; //default blinkm address
  23
  24
  25 void setLED( bool solid,  char color)
  26 {
  27
  28         if (solid)
  29         {
  30            switch (color)
  31                 {
  32
  33                 case 'w':  // white
  34                         BlinkM_stopScript( blinkm_addr );
  35                         BlinkM_fadeToRGB( blinkm_addr, 0xff,0xff,0xff);
  36                         break;
  37
  38                 case 'r': //RED
  39                         BlinkM_stopScript( blinkm_addr );
  40                         BlinkM_fadeToRGB( blinkm_addr, 0xff,0,0);
  41                         break;
  42
  43                 case 'g':// Green
  44                         BlinkM_stopScript( blinkm_addr );
  45                         BlinkM_fadeToRGB( blinkm_addr, 0,0xff,0);
  46                         break;
  47
  48                 case 'b':// Blue
  49                         BlinkM_stopScript( blinkm_addr );
  50                         BlinkM_fadeToRGB( blinkm_addr, 0,0,0xff);
  51                         break;
  52
  53                 case 'c':// Cyan
  54                         BlinkM_stopScript( blinkm_addr );
  55                         BlinkM_fadeToRGB( blinkm_addr, 0,0xff,0xff);
  56                         break;
  57
  58                 case 'm': // Magenta
  59                         BlinkM_stopScript( blinkm_addr );
  60                         BlinkM_fadeToRGB( blinkm_addr, 0xff,0,0xff);
  61                         break;
  62
  63                 case 'y': // yellow
  64                         BlinkM_stopScript( blinkm_addr );
  65                         BlinkM_fadeToRGB( blinkm_addr, 0xff,0xff,0);
  66                         break;
  67
  68                 default: // Black
  69                         BlinkM_stopScript( blinkm_addr );
  70                         BlinkM_fadeToRGB( blinkm_addr, 0,0,0);
  71                         break;
  72                 }
  73         }
  74
  75
  76         else
  77         {
  78                 switch (color)
  79                 {
  80                 case 'r':  // Blink Red
  81                         BlinkM_stopScript( blinkm_addr );
  82                         BlinkM_playScript( blinkm_addr, 3,0,0 );
  83                         break;
  84                 case 'w':  // Blink white
  85                         BlinkM_stopScript( blinkm_addr );
  86                         BlinkM_playScript( blinkm_addr, 2,0,0 );
  87                         break;
  88                 case 'g':  // Blink Green
  89                         BlinkM_stopScript( blinkm_addr );
  90                         BlinkM_playScript( blinkm_addr, 4,0,0 );
  91                         break;
  92
  93                 case 'b': // Blink Blue
  94                         BlinkM_stopScript( blinkm_addr );
  95                         BlinkM_playScript( blinkm_addr, 5,0,0 );
  96                         break;
  97
  98                 case 'c': //Blink Cyan
  99                         BlinkM_stopScript( blinkm_addr );
 100                         BlinkM_playScript( blinkm_addr, 6,0,0 );
 101                         break;
 102
 103                 case 'm': //Blink Magenta
 104                         BlinkM_stopScript( blinkm_addr );
 105                         BlinkM_playScript( blinkm_addr, 7,0,0 );
 106                         break;
 107
 108                 case 'y': //Blink Yellow
 109                         BlinkM_stopScript( blinkm_addr );
 110                         BlinkM_playScript( blinkm_addr, 8,0,0 );
 111                         break;
 112
 113                 default: //OFF
 114                         BlinkM_stopScript( blinkm_addr );
 115                         BlinkM_playScript( blinkm_addr, 9,0,0 );
 116                         break;
 117                 }
 118
 119         }
 120 }
 121
 122 void light_cb( const std_msgs::String& light_cmd){
 123         bool solid =false;
 124         char color;
 125         if (strlen( (const char* ) light_cmd.data) ==2 ){
 126           solid  = (light_cmd.data[0] == 'S') || (light_cmd.data[0] == 's');
 127           color = light_cmd.data[1];
 128         }
 129         else{
 130           solid=  false;
 131           color = light_cmd.data[0];
 132         }
 133
 134         setLED(solid, color);
 135 }
 136
 137
 138
 139 ros::NodeHandle  nh;
 140 ros::Subscriber<std_msgs::String> sub("blinkm" , light_cb);
 141
 142
 143 void setup()
 144 {
 145
 146     pinMode(13, OUTPUT); //set up the LED
 147
 148         BlinkM_beginWithPower();
 149         delay(100);
 150         BlinkM_stopScript(blinkm_addr);  // turn off startup script
 151         setLED(false, 0); //turn off the led
 152
 153         nh.initNode();
 154         nh.subscribe(sub);
 155
 156 }
 157
 158 void loop()
 159 {
 160  nh.spinOnce();
 161  delay(1);
 162 }
Another key feature of this script that should be noted is that the I2C address of the BlinkM is set to the default BlinkM I2C. If yours has been reprogrammed, or if you want to control multiple BlinkMs, you will need to change this address.
Testing
Program you Arduino with the BlinkM sketch. Open the blinkm sketch from the package://roserial_arduino_tutorials/sketches/BlinkM folder and program your Arduino.
Start up the roscore in a new termianl
roscore
Launch the rosserial_python serial_node. Make sure to choose the right serial port.
rosrun rosserial_python serial_node.py _port:=/dev/ttyUSB0
rosrun rosserial_python serial_node.py /dev/ttyUSB0
Now, look at the red blinking light!
rostopic pub blinkm std_msgs/String "br"
Blue light!
rostopic pub blinkm std_msgs/String "sb"


