| |
Introduction to Programming Hiro / NEXTAGE OPEN
Description: Introduction to Various API options to start programming for Hiro (Open) / NEXTAGE OPEN robot.Keywords: Hiro, NEXTAGE, NXO, dual-arm, industrial robot
Tutorial Level: BEGINNER
Next Tutorial: Programming Hiro/NEXTAGE OPEN in OpenRTM
Contents
NOTE: All the tutorials available under the URL http://wiki.ros.org/rtmros_nextage/Tutorials are applicable to the multiple products of Kawada Industries; Hiro (only with the one that opensource software is installed) and NEXTAGE OPEN. To simplify the notation in the rest of the tutorials, we use HiroNXO to appoint the aforementioned robots.
More than five APIs are available via ROS, RTM
Fig. (click to magnify) API diagram for Hiro/NEXTAGE OPEN. You can see that there are multiple interfaces, more from ROS than from HIRONX. For both Hiro (open) and NEXTAGE OPEN, HIRONX works as its main RTM-based python API, and it is the most featured interface for this robot among others, but ROS interface is also actively being developed (as of Sep 2014).
There's a tutorial for each interface in the diagram as follows. Numbers correspond:
Programming via NXO RTM Interface (using hrpsys API in python)
Programming via NXO ROS python Interface using joint_trajectory_action interface
Programming via MoveIt Python Interface
MoveIt! in python
Programming via MoveIt C++ Interface (TBA)
MoveIt! in C++
Programming via low-level ROS I/F (actionlib, JointTrajectoryAction) (TBA)
- Programming via NXO ROS C++ Interface (TBA)
Also general tutorial:
Which API to use
Advantage of RTM interface (HIRONX): As we saw, HiroNXO robot runs on top of OpenRTM and it was relatively recent (back in 2011) when the researchers at University of Tokyo created rtm_ros_bridge (hrpsys_ros_bridge that interrelates the underlining RTM processes and upper level programs written in ROS. With that historical background, no wonder RTM-based interface is more equipped as we've seen some of them in the previous tutorial.
Therefore, for some basic operations (calibration, servo on/off etc.) that are only provided in RTM python client (called HIRONX) class in python (as of Sep 2014), you must use RTM I/F.
Porting every feature to ROS client (py) nor to ROS client (cpp) is NOT planned.
You can mix all the APIs in your single file; for example, in your example_app.py, it's totally fine to import RTM (1 in the diagram above), ROS client (2) and move_group_commander (3) altogether.
- Yes, as long as written in the same language (Py or C++).
HiroNXO 3D model coordination
Coordinate at end effector
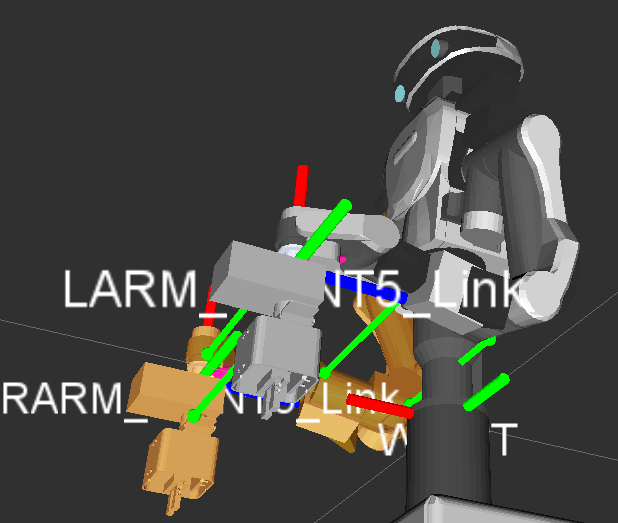
With lack of universal convention for the coordinate axis for the end effectors, HiroNXO employs the following concept (assuming the arms are at goInitial pose): roll axis heads toward above, pitch leftward (looking from the robot) and yaw points toward the robot itself, like the image below.

Fig2. Despite that the tf frames in the figure are the links at the tip of both arms, not joints nor EEFs themselves, this should give you an idea of the coordinate direction explained above. Each arrow representation follows RViz convention. That is, Red:Green:Blue = Roll:Pitch:Yaw.
Ref. More info from the original developer.
Confusion with certain commands
HIRONX.setTargetPose takes a tf frame as a reference (as an argument frame_name). By default it is set to WAIST frame, which orients as you see in the image (x+ axis to the front, y+ axis to the left, z+ axis to above).

With this in mind, the following setTargetPose commands rotates the right hand about yaw axis w.r.t WAIST frame.
robot.setTargetPose('rarm', [0.32, -0.18, 0.06], [-3, -1.5, 3.0], tm=3)
robot.setTargetPose('rarm', [0.32, -0.18, 0.06], [-3, -1.5, 4.0], tm=3) 


