QAProcess: DevelopersGuide | Review Status | PackageProposalProcess | PackageDocumentation | APIReviewProcess | DocReviewProcess | CodeReviewProcess | StackDocumentation | StackVersionPolicy | AutomatedTesting | StackReleaseProcess | WritingTutorials | Graveyard
| Note: Before writing a tutorial take the time to review the ROS tutorials. |
| |
チュートリアルの書き方
Description: このチュートリアルはros.orgに関するガイダンスのために利用できるサンプルチュートリアルにそってチュートリアルを記述するための便利なテンプレートとマクロを押さえます。Keywords: teaching, tutorials, writing
Tutorial Level: BEGINNER
Contents
初めに
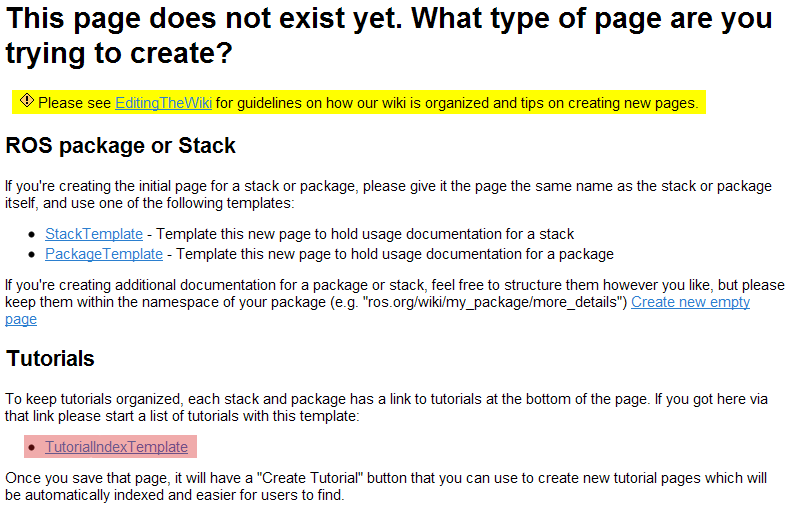
チュートリアルの書き方についてはじめるために、チュートリアルを書こうと思っているスタックとパッケージのページに行ってください。もし、まだチュートリアルがなかった場合は、存在しない/Tutorialsウィキのページに行ってください。
ページを開けたときに、リダイレクトがおきると思います。

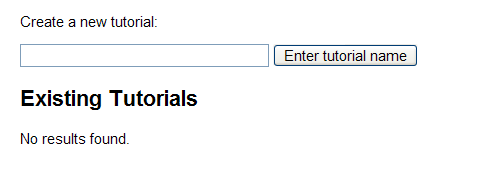
TutorialIndexTemplateリンクをクリックして、何も変更せずにプレビューページを保存してください。これにより、以下のようにチュートリアルを作るための新しいページを作成します:

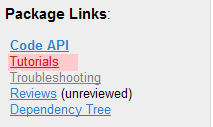
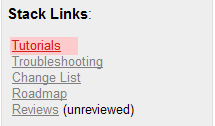
このページは、チュートリアルを作成するのに役立ち、現在のチュートリアルのリストを表示します。スタックやパッケージのページのサイドバーには、以下のようなチュートリアルのために作られたリンクがあると思います。:
|
|
新しいチュートリアルを作成する
create a new tutorialボックスの中に、新しく作成するチュートリアルのページ名を書き込み、ボタンを押してください。これは、TutorialTemplateを使用した新しいページを作ります。
####################################
##FILL ME IN
####################################
## for a custom note with links:
## !note =
## for the canned note of "This tutorial assumes that you have completed the
## previous tutorials:" just add the links
## !note.0.link=
## descriptive title for the tutorial
## !title =
## multi-line description to be displayed in search
## !description =
## the next tutorial description (optional)
## !next =
## links to next tutorial (optional)
## !next.0.link=
## !next.1.link=
## what level user is this tutorial for
## !level= (BeginnerCategory, IntermediateCategory, AdvancedCategory)
## !keywords =
####################################

!<<IncludeCSTemplate(TutorialCSHeaderTemplate)>>
少なくとも一度ページをセーブするまで、プレビューボタンはきちんと働かないのでご注意ください。
テンプレートヘッダを埋める
上記のテンプレートは、このページの上部に似たヘッダを自動生成します。テンプレートと異なる部分をみて、どのように使われているかをご覧ください。
注意書きについて
チュートリアルを進める人のための注意点や情報を、ページ上部の青い四角の中に埋め込むことができます。
このようにテキストを埋めると、以下のような完全にカスタムな注意書きを埋め込むことができます。
note= This is my awesome text
Note: This is my awesome text. |
また、以下のようにも使用できます:
note.0=[[ROS/Tutorials|ROS tutorials]]
note.1=[[Documentation| ros.org]]
こうすると、標準的な注意書きの下にリンクを張ることができ、This tutorial assumes that you have completed the previous tutorials:という言葉がつづきます。以下のようになります:
Note: This tutorial assumes that you have completed the previous tutorials: ROS tutorials, ros.org. |
カスタムテキストの注意書きにリンクを張りたいならnote.0, note.1, etcで明示するのではなく、noteに書く必要があります。こうすると、"This tutorial assumes that you have completed the previous tutorials:"を非表示にできます。
title
これは、ページのトップに表示され、チュートリアルのインデックスページに表示されるタイトルになる記述的なタイトルです。
!title= My Awesome Tutorial
Description
これは、ページのトップに表示され、チュートリアルのインデックスページに表示されるタイトルになる説明です。
description= My awesome tutorial is amazingly awesome and cool, you won't even believe it, do it now!
これは、以下のように見えます:
Description: My awesome tutorial is amazingly awesome and cool, you won't even believe it, do it now! |
Next
これは、今のチュートリアルの後に来るチュートリアルにリンクするのに使われます。これらはオプションに過ぎないので、何も値が埋まってなかったら、何も表示しません。
next=Here are the next awesome tutorials
next.0.link=[[ROS/Tutorials|ROS tutorials]]
next.1.link=[[actionlib_tutorials/Tutorials|actionlib tutorials]]
以下のように見えます。:
Next Tutorial: Here are the next awesome tutorials ROS tutorials actionlib tutorials. |
または次のように見えます:
next.0.link=[[actionlib_tutorials/Tutorials|Actionlib tutorials]]
以下のように見えます。:
Next Tutorial: Actionlib tutorials. |
Level
このキーは2つの目的を持っており、今から見るチュートリアルのレベルを知ることができるのと、チュートリアルのインデックスページの検索でカテゴリを分けるのに使います。
level=AdvancedCategory
以下のように見えます。:
Tutorial Level: ADVANCED |
Keywords
ここで、チュートリアルを検索するためのキーワードを設定できます。
keywords= great, cool, awesome
以下のように見えます。:
Keywords: great, cool, awesome |
便利なマクロ
チュートリアルを書くにあたり便利なマクロを紹介します。
パーサ
現在、このwikiで使用できるインストールされているのは以下のパーサです。:
c++
- example:
{{{
#!cplusplus
#include <ros/ros.h>
int main(int argc, char** argv)
{
  ros::init(argc, argv, "talker");
  ros::NodeHandle n;
...
}}}
latex
- example:
{{{
#!latex
$$\overline{\overline{J}} \dot{\overline{v}} = -\overline{k}$$
}}}
latex error! exitcode was 1 (signal 0), transscript follows:

This is pdfTeX, Version 3.14159265-2.6-1.40.19 (TeX Live 2018) (preloaded format=latex)

kpathsea: Running mktexfmt latex.fmt
mktexfmt: mktexfmt is using the following fmtutil.cnf files (in precedence order):
mktexfmt:   /usr/share/texlive/texmf-dist/web2c/fmtutil.cnf
mktexfmt: mktexfmt is using the following fmtutil.cnf file for writing changes:
mktexfmt:   /usr/share/httpd/.texlive2018/texmf-config/web2c/fmtutil.cnf
/usr/bin/mktexfmt: mkdir(/usr/share/httpd/.texlive2018/) failed: Permission denied
I can't find the format file `latex.fmt'!
python
- example:
{{{
#!python
#!/usr/bin/env python
import roslib; roslib.load_manifest('beginner_tutorials')
import rospy
from std_msgs.msg import String
def talker():
    pub = rospy.Publisher('chatter', String)
    rospy.init_node('talker', anonymous=True)
...
}}}
コードリファレンス
チュートリアルでは、以前に作ったチュートリアルからコードのブロックを参照したいときに、CodeRefが便利です。
{{{
#!cplusplus block=blockname
code....
is super
and awesome
}}}CodeRefのマクロで参照することができます。
<<CodeRef(blockname,1,2)>>
これは以下のようになります。
FullSearchWithDescriptionsCS
FullSearchWithDescriptionsCSは、チュートリアルのインデックスを自動生成するのに使われ、異なるキーワードを通して検索することができます。
<<FullSearchWithDescriptionsCS(title:WritingTutorials BeginnerCategory)>>
これはタイトルとチュートリアルの説明をWritingTutorialsのタイトルと、BeginnerCategoryをキーワードにして表示します。もしカテゴリがAdvancedCategoryに指定されていたら、何も表示されません。
- How to Write a Tutorial
This tutorial covers useful template and macros for writing tutorials, along with example tutorials that are available for guidance on ros.org
- Como escrever um tutorial
This tutorial covers useful template and macros for writing tutorials, along with example tutorials that are available for guidance on ros.org
- 如何编写教程
(概述:)本教程介绍在编辑ros.org维基时可以用到的模板和宏定义,并附有示例以供参考。
- チュートリアルの書き方
このチュートリアルはros.orgに関するガイダンスのために利用できるサンプルチュートリアルにそってチュートリアルを記述するための便利なテンプレートとマクロを押さえます。
- 튜토리얼 작성하기
이 튜토리얼은 튜토리얼 작성을 위한 튜토리얼입니다.
IncludeCSTemplate
このマクロは、ページの上部にキーを取り、clearsilverテンプレートのコマンドが使えるところで操作できるclearsilverの変数に変換します。チュートリアルの場合、TutorialCSHeaderTemplateの中でキーは使われます。
!<<IncludeCSTemplate(TutorialCSHeaderTemplate)>>
メディアサーバ
Youtube,Vimeo のビデオを次のようにして貼り付けることができます.
チュートリアルの例
ここには、チュートリアルの手本にするのに適しているチュートリアルのリストがあります。


