| Note: This tutorial assumes that you have completed the previous tutorials: RGB-D Hand-Held Mapping With a Kinect. |
| |
Setup RTAB-Map on Your Robot!
Description: This tutorial shows multiple RTAB-Map configurations that can be used on your robot.Tutorial Level: INTERMEDIATE
Next Tutorial: Mapping and Navigation with Turtlebot
Contents
Introduction
The robot must be equipped at least with a Kinect-like sensor. I recommend highly to calibrate your Kinect-like sensor following this guide. If you want to use a 2D laser, the Kinect's clouds must be aligned with the laser scans.
I will present in the next sections some possible configurations depending on the robot with example launch files.
Recommended robot configuration:
A 2D laser which outputs sensor_msgs/LaserScan messages.
Odometry (IMU, wheel encoders, ...) which outputs nav_msgs/Odometry message.
A calibrated Kinect-like sensor compatible with openni_launch, openni2_launch or freenect_launch ros packages.
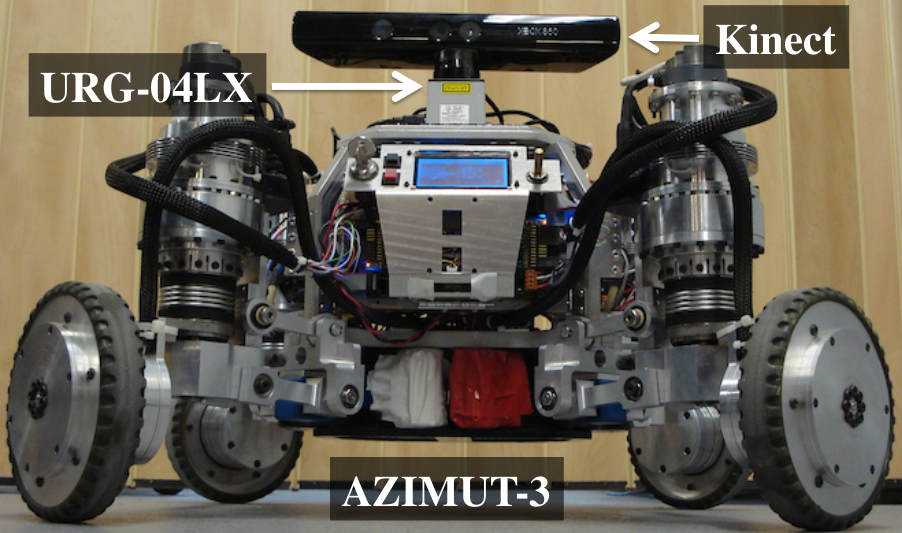
These examples are based on what I did for AZIMUT3. The robot is equipped with a Kinect, an URG-04LX and odometry is provided using the wheel encoders.
Bring-up your robot
If your robot has odometry: the robot should publish his odometry in nav_msgs/Odometry format.
If you have a laser: launch the laser node, it should publish sensor_msgs/LaserScan messages. Here we use hokuyo_node node.
Launch OpenNI with depth_registration:=true:
$ roslaunch openni_launch openni.launch depth_registration:=true
TF transforms must be provided (through using robot's URDF or manually in a file using static transform publishers). The main useful transforms are "/odom", "/base_link", "/base_laser_link" and "/camera_link".
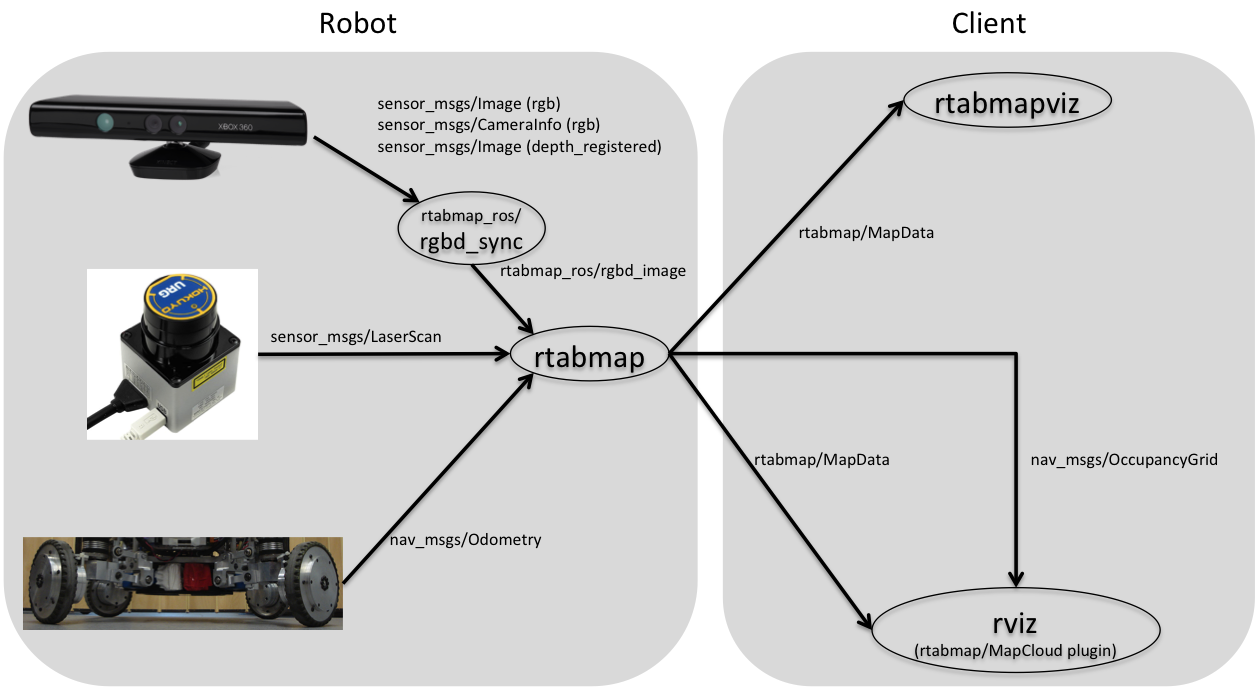
Kinect + Odometry + 2D laser
In this configuration, I assume that you have a wheeled robot constrained to the plane XY with only rotation on yaw (around z-axis).
<launch>
  <group ns="rtabmap">

    <!-- Use RGBD synchronization -->
    <!-- Here is a general example using a standalone nodelet,
         but it is recommended to attach this nodelet to nodelet
         manager of the camera to avoid topic serialization -->
    <node pkg="nodelet" type="nodelet" name="rgbd_sync" args="standalone rtabmap_ros/rgbd_sync" output="screen">
      <remap from="rgb/image"       to="/camera/rgb/image_rect_color"/>
      <remap from="depth/image"     to="/camera/depth_registered/image_raw"/>
      <remap from="rgb/camera_info" to="/camera/rgb/camera_info"/>
      <remap from="rgbd_image"      to="rgbd_image"/> <!-- output -->

      <!-- Should be true for not synchronized camera topics
           (e.g., false for kinectv2, zed, realsense, true for xtion, kinect360)-->
      <param name="approx_sync"       value="true"/>
    </node>

    <node name="rtabmap" pkg="rtabmap_ros" type="rtabmap" output="screen" args="--delete_db_on_start">
          <param name="frame_id" type="string" value="base_link"/>

          <param name="subscribe_depth" type="bool" value="false"/>
          <param name="subscribe_rgbd" type="bool" value="true"/>
          <param name="subscribe_scan" type="bool" value="true"/>

          <remap from="odom" to="/base_controller/odom"/>
          <remap from="scan" to="/base_scan"/>
          <remap from="rgbd_image" to="rgbd_image"/>

          <param name="queue_size" type="int" value="10"/>

          <!-- RTAB-Map's parameters -->
          <param name="RGBD/NeighborLinkRefining" type="string" value="true"/>
          <param name="RGBD/ProximityBySpace"     type="string" value="true"/>
          <param name="RGBD/AngularUpdate"        type="string" value="0.01"/>
          <param name="RGBD/LinearUpdate"         type="string" value="0.01"/>
          <param name="RGBD/OptimizeFromGraphEnd" type="string" value="false"/>
          <param name="Grid/FromDepth"            type="string" value="false"/> <!-- occupancy grid from lidar -->
          <param name="Reg/Force3DoF"             type="string" value="true"/>
          <param name="Reg/Strategy"              type="string" value="1"/> <!-- 1=ICP -->

          <!-- ICP parameters -->
          <param name="Icp/VoxelSize"                 type="string" value="0.05"/>
          <param name="Icp/MaxCorrespondenceDistance" type="string" value="0.1"/>
    </node>
  </group>
</launch>
Let's break down this launch file:
<group ns="rtabmap">
For convenience, we put rtabmap node in rtabmap namespace. rtabmap node provides services which can conflict with other services from other nodes.
<node pkg="nodelet" type="nodelet" name="rgbd_sync" args="standalone rtabmap_ros/rgbd_sync" output="screen">
  <remap from="rgb/image"        to="/camera/rgb/image_rect_color"/>
  <remap from="depth/image"      to="/camera/depth_registered/image_raw"/>
  <remap from="rgb/camera_info"  to="/camera/rgb/camera_info"/>
  <remap from="rgbd_image"       to="rgbd_image"/>

  <param name="approx_sync"       value="true"/>
</node>
In this example, because rtabmap node synchronizes topics coming from different sensors, we use rgbd_sync nodelet to make sure that our image topics are correctly synchronized together before feeding them to rtabmap. The output rgbd_image is a rtabmap_ros/RGBDImage message. The parameter approx_sync should be true when camera topics are not already synchronized by the camera node like here for freenect or openni2 drivers for Kinect For Xbox 360. approx_sync should be false with camera drivers for Kinect v2, ZED or realsense as they publish rgb and depth topics already synchronized (same stamp).
<node name="rtabmap" pkg="rtabmap_ros" type="rtabmap" output="screen" args="--delete_db_on_start">
The --delete_db_on_start argument will make rtabmap to delete the database (default located in ~/.ros/rtabmap.db) when starting. If you want the robot to continue mapping from a previous mapping session, you should remove --delete_db_on_start.
<param name="frame_id" type="string" value="base_link"/>
The "frame_id" should be a fixed frame on the robot.
<param name="subscribe_depth" type="bool" value="true"/>
<param name="subscribe_scan" type="bool" value="true"/>
By default, subscribe_depth is true. However, in this setup, we will use RGB-D image input instead, so subscribe_depth is set to false and subscribe_rgbd is set to true. Since we have a 2D lidar, set subscribe_scan to true. If we have a 3D lidar publishing sensor_msgs/PointCloud2 messages, set subscribe_scan_cloud to true instead and remap corresponding scan_cloud topic instead of scan.
When subscribe_rgbd=true, rgbd_image input topic should be set.
When subscribe_scan=true, scan input topics should be set.
<remap from="odom" to="/base_controller/odom"/>
<remap from="scan" to="/base_scan"/>
<remap from="rgbd_image" to="rgbd_image"/>
Set the required input topics. Note that rgbd_image doesn't have leading slash, which means it subscribe to rgbd_image in its namespace, which would be /rtabmap/rgbd_image in this case.
<param name="queue_size" type="int" value="10"/>
Used for synchronization of the input topics above. The rtabmap node synchronizes /base_controller/odom, /base_scan and /rtabmap/rgbd_image in a single callback. Higher the value, more flexible can be the rate used for each topic. On AZIMUT3, /base_controller/odom is published at 50 Hz, /base_scan at 10 Hz, and the images at 30 Hz.
<!-- RTAB-Map's parameters -->
<param name="RGBD/NeighborLinkRefining" type="string" value="true"/>
<param name="RGBD/ProximityBySpace"     type="string" value="true"/>
<param name="RGBD/AngularUpdate"        type="string" value="0.01"/>
<param name="RGBD/LinearUpdate"         type="string" value="0.01"/>
<param name="RGBD/OptimizeFromGraphEnd" type="string" value="false"/>
<param name="Grid/FromDepth"            type="string" value="false"/>
<param name="Reg/Force3DoF"             type="string" value="true"/>
<param name="Reg/Strategy"              type="string" value="1"/> <!-- 1=ICP -->

<!-- ICP parameters -->
<param name="Icp/VoxelSize"                 type="string" value="0.05"/>
<param name="Icp/MaxCorrespondenceDistance" type="string" value="0.1"/>
This section sets the RTAB-Map's parameters (the same as in Preferences dialog in the standalone version). To know all RTAB-Map's parameters that can be set with some descriptions, execute this command:
$ rosrun rtabmap_ros rtabmap --params
Here is a brief overview of the main parameters set here:
RGBD/NeighborLinkRefining: Correct odometry using the input lidar topic using ICP.
RGBD/ProximityBySpace: Find local loop closures based on the robot position in the map. It is useful when the robot, for example, is coming back in the opposite direction. With camera facing back, global loop closures cannot be found. So using the position and previously added laser scans to the map, we find the transform using ICP.
RGBD/AngularUpdate: The robot should move to update the map (if not 0).
RGBD/LinearUpdate: The robot should move to update the map (if not 0).
RGBD/OptimizeFromGraphEnd: By setting to false (which is the default), on loop closures the graph will be optimized from the first pose in the map. The TF /map -> /odom will change when this happens. When set to false, the graph is optimized from the latest node added to the map instead of the first. By optimizing from the last, the last pose keeps its value and all the previous poses are corrected according to it (so /odom and /map will always match together).
Grid/FromDepth: If true, the occupancy grid is created from the cloud generated by the depth camera. If false, the occupancy grid is created from the laser scans.
Reg/Force3DoF: Force 3DoF registration: roll, pitch and z won't be estimated.
Reg/Strategy: We chose ICP to refine global loop closures found with ICP using the laser scans.
Icp/VoxelSize: Scans are filtered down to voxel of 5 cm before doing ICP.
Icp/MaxCorrespondenceDistance: Maximum distance between points during registration by ICP.
  </node>
</group>
Close the group.
Kinect + Odometry + Fake 2D laser from Kinect
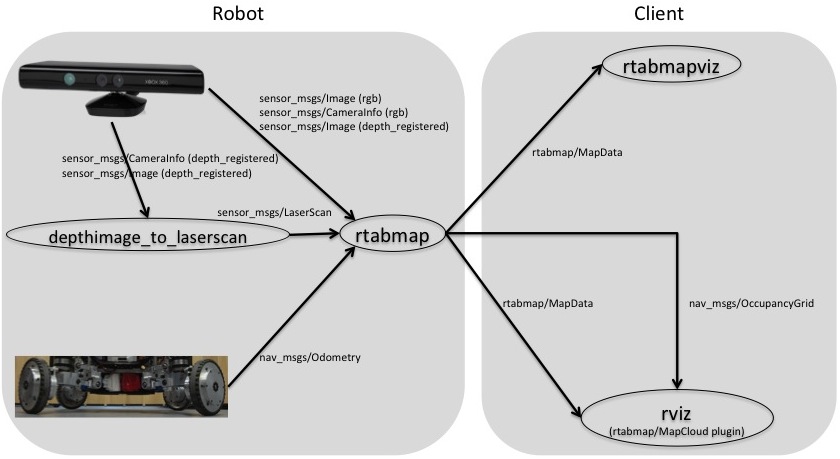
If you don't have a laser and you want to create a 2D occupancy grid map (for which laser scans are required), you can simulate a 2D laser with the depth image from the Kinect using depthimage_to_laserscan ros-pkg. This was the configuration used for the IROS 2014 Kinect Contest. This could be also used with a robot like the TurtleBot. Unlike with a real lidar on example above, I don't recommend setting Reg/Strategy to 1 (for ICP) because the field of view of the camera is too small to have good ICP registrations.
<launch>
  <!-- Kinect cloud to laser scan -->
    <node pkg="depthimage_to_laserscan" type="depthimage_to_laserscan" name="depthimage_to_laserscan">
      <remap from="image"       to="/camera/depth_registered/image_raw"/>
      <remap from="camera_info" to="/camera/depth_registered/camera_info"/>
      <remap from="scan"        to="/kinect_scan"/>
      <param name="range_max" type="double" value="4"/>
    </node>

  <!-- SLAM -->
  <group ns="rtabmap">
    <node name="rtabmap" pkg="rtabmap_ros" type="rtabmap" output="screen" args="--delete_db_on_start">
          <param name="frame_id" type="string" value="base_footprint"/>

          <param name="subscribe_depth" type="bool" value="true"/>
          <param name="subscribe_scan" type="bool" value="true"/>

          <remap from="odom" to="/base_controller/odom"/>
          <remap from="scan" to="/kinect_scan"/>

          <remap from="rgb/image"       to="/camera/rgb/image_rect_color"/>
          <remap from="depth/image"     to="/camera/depth_registered/image_raw"/>
          <remap from="rgb/camera_info" to="/camera/rgb/camera_info"/>

          <param name="queue_size" type="int" value="10"/>

          <!-- RTAB-Map's parameters -->
          <param name="RGBD/ProximityBySpace"     type="string" value="false"/>
          <param name="RGBD/AngularUpdate"        type="string" value="0.01"/>
          <param name="RGBD/LinearUpdate"         type="string" value="0.01"/>
          <param name="RGBD/OptimizeFromGraphEnd" type="string" value="false"/>
          <param name="Reg/Force3DoF"             type="string" value="true"/>
          <param name="Vis/MinInliers"            type="string" value="12"/>
    </node>
  </group>
</launch>
Kinect + 2D laser
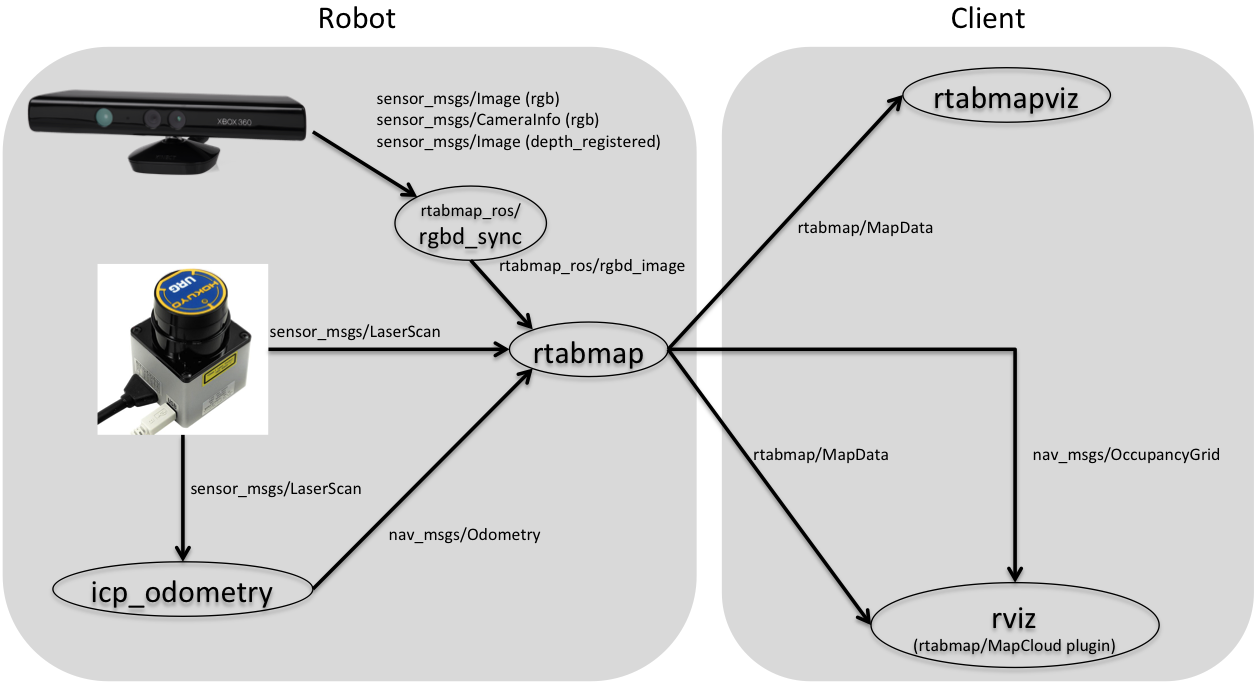
In you don't have odometry, you can create one using the 2D laser scans and ICP. Once you have this new odometry node, you can do the same steps as above (with odometry). To generate odometry from laser scans, take a look at these packages: laser_scan_matcher or hector_slam. NEW RTAB-Map has now its own icp_odometry node.
Here is an example on how hector_slam can be integrated with rtabmap: demo_hector_mapping.launch. you can try it with this bag: demo_mapping.bag (you should remove the "/odom" tf from the bag first) :
$ rosbag filter demo_mapping.bag demo_mapping_no_odom.bag 'topic != "/tf" or topic == "/tf" and m.transforms[0].header.frame_id != "/odom"'
$ roslaunch rtabmap_ros demo_hector_mapping.launch hector:=true
$ rosbag play --clock demo_mapping_no_odom.bag
For an example using rtabmap_ros/icp_odometry, set hector argument to false above. For the best results, build rtabmap with libpointmatcher dependency.
2D laser only
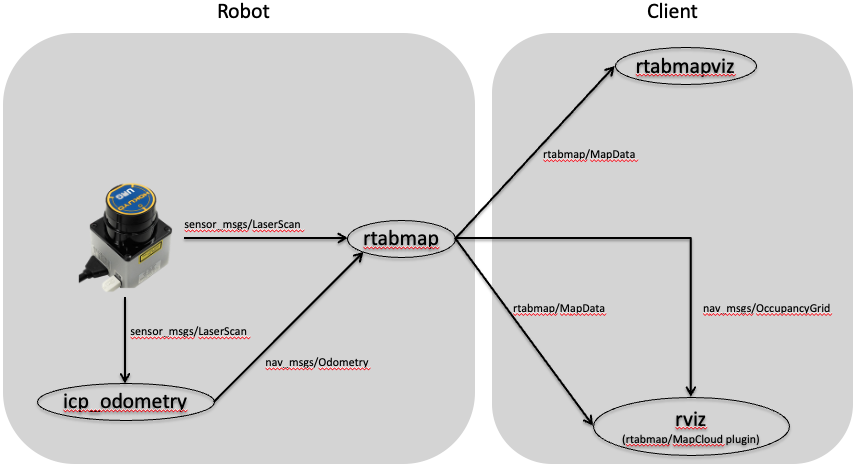
This is the same example than above with Kinect+Laser but without a camera. If you have only a lidar without wheel odometry, you could try this setup. Obviously without a camera, you lose the ability to detect global loop closures or globally localize using vision. If odometry doesn't drift too much, proximity detections can still be detected to correct odometry over time. We will again use demo_mapping.bag without wheel odometry and same launch file (demo_hector_mapping.launch) but with argument "camera:=false" to disable camera stuff:
$ rosbag filter demo_mapping.bag demo_mapping_no_odom.bag 'topic != "/tf" or topic == "/tf" and m.transforms[0].header.frame_id != "/odom"'
$ roslaunch rtabmap_ros demo_hector_mapping.launch hector:=true camera:=false
$ rosbag play --clock demo_mapping_no_odom.bag
For an example using rtabmap_ros/icp_odometry, set hector argument to false above. For the best results, build rtabmap with libpointmatcher dependency.
2D laser + Wheel Odometry as guess
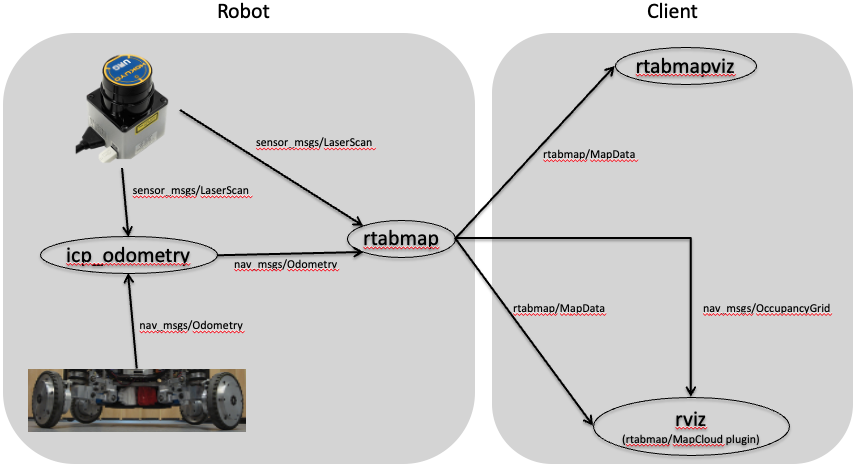
This is the same example than above with Laser only but here we use wheel odometry as guess for icp_odometry. This will make icp_odometry more robust to corridor-like environments with short-range lidars. For this example, we will use the orignal demo_mapping.bag with wheel odometry. Here we should set "hector:=false" and "odom_guess:=true" with launch file demo_hector_mapping.launch:
$ roslaunch rtabmap_ros demo_hector_mapping.launch hector:=false camera:=false odom_guess:=true
$ rosbag play --clock demo_mapping.bag
Obviously without a camera, you lose the ability to detect global loop closures or globally localize using vision. If odometry doesn't drift too much, proximity detections can still be detected to correct odometry over time. The same example can be ran with a camera for comparison by setting "camera:=true". For the best results, build rtabmap with libpointmatcher dependency.
Kinect + Odometry
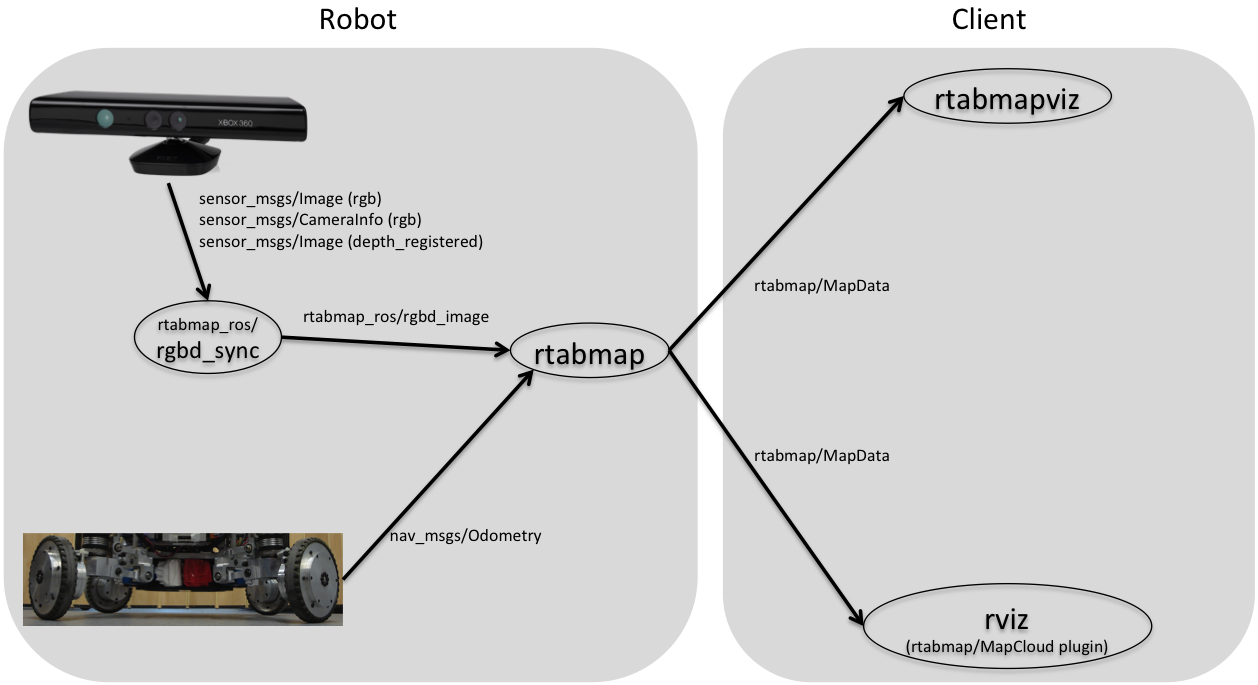
In this configuration, I assume that you have a robot not constrained to a single plane (like UAV), which can move in XYZ and roll, pitch, yaw rotations.
<launch>
  <group ns="rtabmap">

    <node pkg="nodelet" type="nodelet" name="rgbd_sync" args="standalone rtabmap_ros/rgbd_sync" output="screen">
      <remap from="rgb/image"       to="/camera/rgb/image_rect_color"/>
      <remap from="depth/image"     to="/camera/depth_registered/image_raw"/>
      <remap from="rgb/camera_info" to="/camera/rgb/camera_info"/>
      <remap from="rgbd_image"      to="rgbd_image"/> <!-- output -->

      <!-- Should be true for not synchronized camera topics
           (e.g., false for kinectv2, zed, realsense, true for xtion, kinect360)-->
      <param name="approx_sync"       value="true"/>
    </node>

    <node name="rtabmap" pkg="rtabmap_ros" type="rtabmap" output="screen" args="--delete_db_on_start">
          <param name="frame_id" type="string" value="base_link"/>

          <param name="subscribe_depth" type="bool" value="false"/>
          <param name="subscribe_rgbd" type="bool" value="true"/>

          <remap from="odom" to="/base_controller/odom"/>

          <remap from="rgbd_image" to="rgbd_image"/>

          <param name="queue_size" type="int" value="10"/>

          <!-- RTAB-Map's parameters -->
          <param name="RGBD/AngularUpdate"        type="string" value="0.01"/>
          <param name="RGBD/LinearUpdate"         type="string" value="0.01"/>
          <param name="RGBD/OptimizeFromGraphEnd" type="string" value="false"/>
    </node>
  </group>
</launch>
Kinect
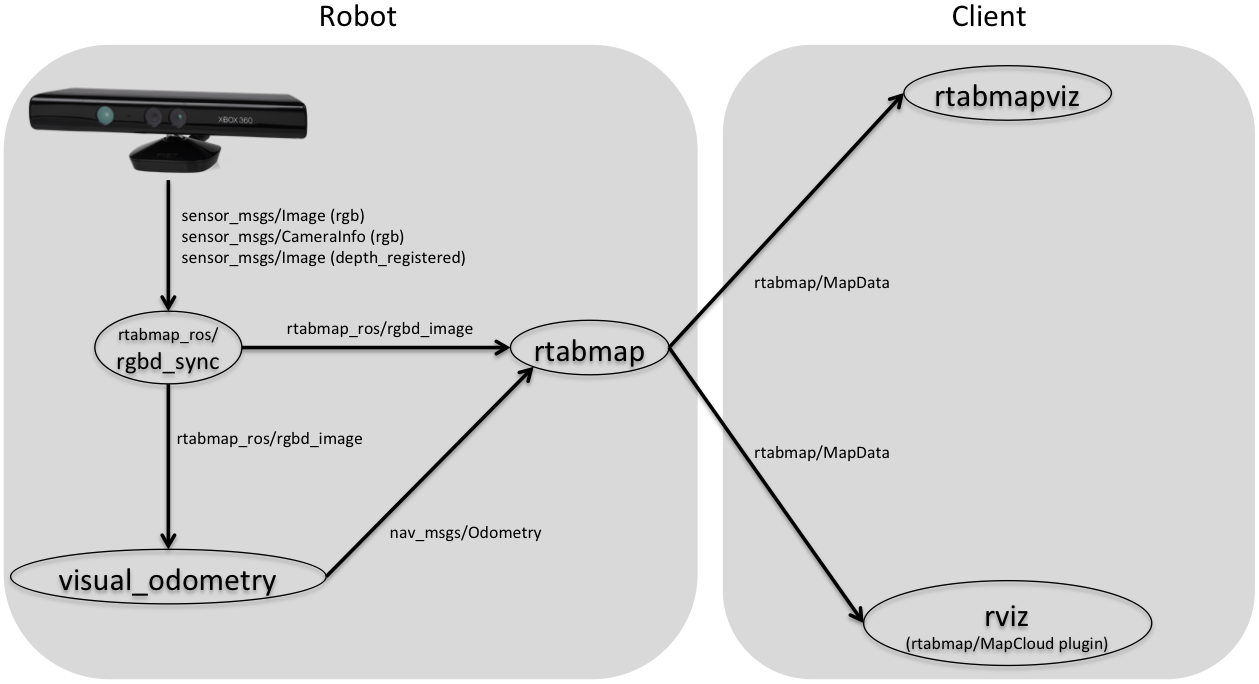
If you can't have a reliable odometry, you can map using only RTAB-Map at the cost of "lost odometry" (like the RED screens in the standalone version). The robot may detect this "lost" state when a null odometry message is sent by the rgbd_odometry node.
<launch>
  <group ns="rtabmap">

    <node pkg="nodelet" type="nodelet" name="rgbd_sync" args="standalone rtabmap_ros/rgbd_sync" output="screen">
      <remap from="rgb/image"        to="/camera/rgb/image_rect_color"/>
      <remap from="depth/image"      to="/camera/depth_registered/image_raw"/>
      <remap from="rgb/camera_info"  to="/camera/rgb/camera_info"/>
      <remap from="rgbd_image"       to="rgbd_image"/> <!-- output -->

      <!-- Should be true for not synchronized camera topics
           (e.g., false for kinectv2, zed, realsense, true for xtion, kinect360)-->
      <param name="approx_sync"       value="true"/>
    </node>

    <!-- Odometry -->
    <node pkg="rtabmap_ros" type="rgbd_odometry" name="rgbd_odometry" output="screen">
      <param name="subscribe_rgbd" type="bool"   value="true"/>
      <param name="frame_id"       type="string" value="base_link"/>
      <remap from="rgbd_image" to="rgbd_image"/>
    </node>

    <node name="rtabmap" pkg="rtabmap_ros" type="rtabmap" output="screen" args="--delete_db_on_start">
          <param name="frame_id"        type="string" value="base_link"/>
          <param name="subscribe_depth" type="bool"   value="false"/>
          <param name="subscribe_rgbd"  type="bool"   value="true"/>

          <remap from="odom"       to="odom"/>
          <remap from="rgbd_image" to="rgbd_image"/>

          <param name="queue_size"  type="int"  value="10"/>
          <param name="approx_sync" type="bool" value="false"/>

          <!-- RTAB-Map's parameters -->
          <param name="RGBD/AngularUpdate"        type="string" value="0.01"/>
          <param name="RGBD/LinearUpdate"         type="string" value="0.01"/>
          <param name="RGBD/OptimizeFromGraphEnd" type="string" value="false"/>
    </node>
  </group>
</launch>
Note that we set `approx_sync` to false for `rtabmap` node to make sure it uses exactly the `odom` computed with the same `rgbd_image` topic.
Stereo A
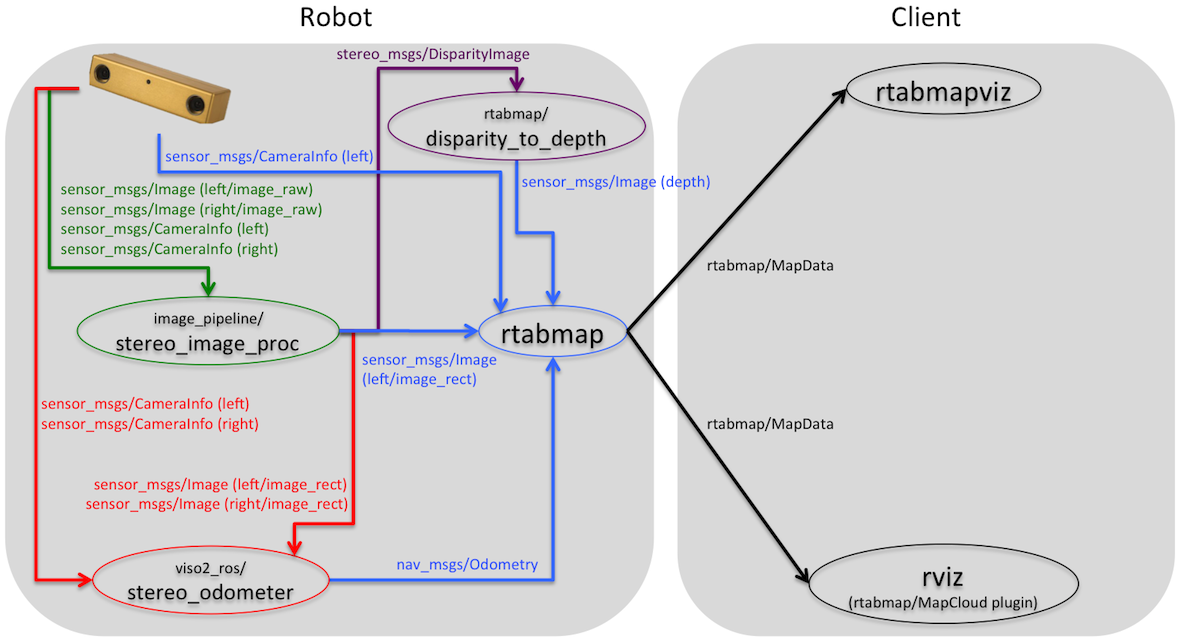
RTAB-Map can be also used with a stereo camera. As shown in the picture above, you will need to install viso2_ros and the stereo_image_proc nodes.
<launch>
  <!-- Run the ROS package stereo_image_proc for image rectification and disparity computation -->
  <group ns="stereo">
    <node pkg="stereo_image_proc" type="stereo_image_proc" name="stereo_image_proc"/>

    <!-- Disparity to depth -->
    <node pkg="nodelet" type="nodelet" name="disparity2depth" args="standalone rtabmap_ros/disparity_to_depth"/>
  </group>

  <!-- Odometry: Run the viso2_ros package -->
  <node pkg="viso2_ros" type="stereo_odometer" name="stereo_odometer" output="screen">
    <remap from="stereo" to="stereo"/>
    <remap from="image"  to="image_rect"/>
    <param name="base_link_frame_id"      value="/base_link"/>
    <param name="odom_frame_id"           value="/odom"/>
    <param name="ref_frame_change_method" value="1"/>
  </node>

  <group ns="rtabmap">
    <!-- Visual SLAM -->
    <node name="rtabmap" pkg="rtabmap_ros" type="rtabmap" output="screen" args="--delete_db_on_start">
      <param name="subscribe_depth"     type="bool" value="true"/>
      <param name="subscribe_laserScan" type="bool" value="false"/>

      <remap from="rgb/image"       to="/stereo/left/image_rect"/>
      <remap from="rgb/camera_info" to="/stereo/left/camera_info"/>
      <remap from="depth/image"     to="/stereo/depth"/>

      <remap from="odom" to="/stereo_odometer/odometry"/>

      <param name="frame_id"    type="string" value="/base_link"/>
      <param name="queue_size"  type="int"    value="30"/>
      <param name="approx_sync" type="bool"   value="false"/>

      <param name="Vis/MinInliers" type="string" value="12"/>
    </node>
  </group>
</launch>
Note that we set `approx_sync` to false for `rtabmap` node to make sure it uses exactly the `odom` computed with the same image topics.
Stereo B
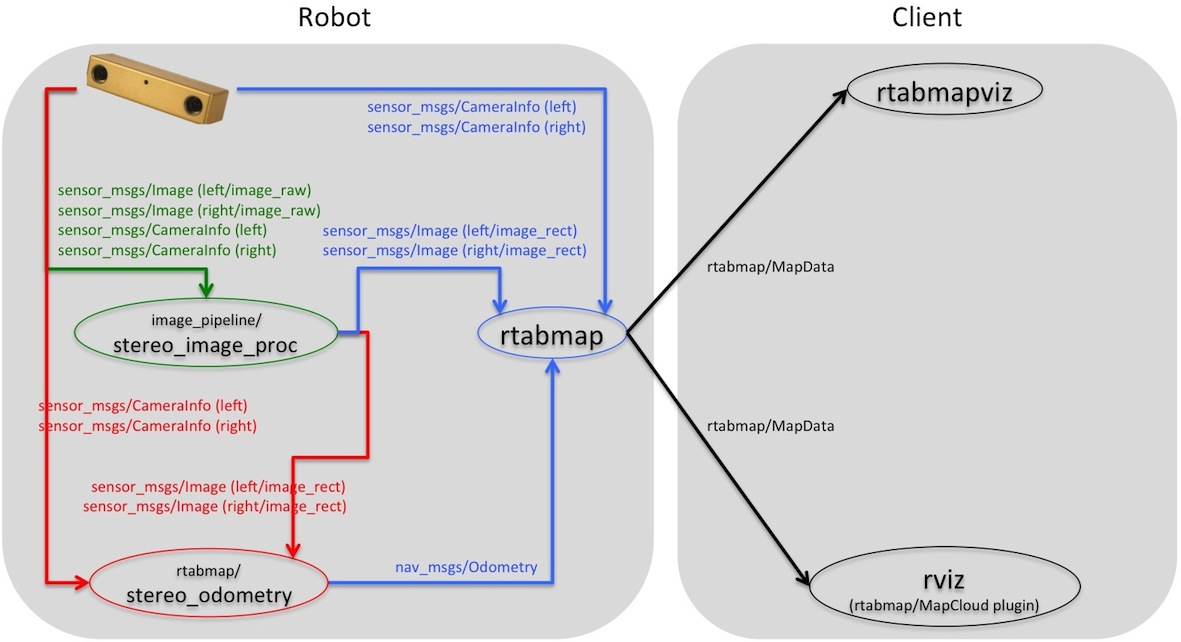
The page StereoOutdoorMapping shows a working demonstration that you can try with the provided rosbag. For actual mapping with your stereo camera, you camera driver should publish image messages like these (the camera namespace can be different than stereo_camera):
$ rostopic list
/stereo_camera/left/image_raw
/stereo_camera/left/camera_info
/stereo_camera/right/image_raw
/stereo_camera/right/camera_info
and assuming that the camera driver provides TF stereo_camera and that left and right images are synchronized (note the approx_sync set to false), the corresponding launch file could be like this:
<launch>
<arg name="pi/2" value="1.5707963267948966" />
<arg name="optical_rotate" value="0 0 0 -$(arg pi/2) 0 -$(arg pi/2)" />
<node pkg="tf" type="static_transform_publisher" name="camera_base_link"
     args="$(arg optical_rotate) base_link stereo_camera 100" />

<!-- Run the ROS package stereo_image_proc -->
<group ns="/stereo_camera" >
    <node pkg="stereo_image_proc" type="stereo_image_proc" name="stereo_image_proc"/>

    <!-- Odometry -->
    <node pkg="rtabmap_ros" type="stereo_odometry" name="stereo_odometry" output="screen">
        <remap from="left/image_rect"       to="left/image_rect"/>
        <remap from="right/image_rect"      to="right/image_rect"/>
        <remap from="left/camera_info"      to="left/camera_info"/>
        <remap from="right/camera_info"     to="right/camera_info"/>

        <param name="frame_id" type="string" value="base_link"/>
        <param name="odom_frame_id" type="string" value="odom"/>
        <param name="approx_sync"   type="bool" value="false"/>
        <param name="queue_size"    type="int" value="5"/>

        <param name="Odom/MinInliers" type="string" value="12"/>
        <param name="Odom/RoiRatios"  type="string" value="0.03 0.03 0.04 0.04"/>
    </node>
</group>

<group ns="rtabmap">
  <node name="rtabmap" pkg="rtabmap_ros" type="rtabmap" output="screen" args="--delete_db_on_start">
     <param name="frame_id" type="string" value="base_link"/>
     <param name="subscribe_stereo" type="bool" value="true"/>
     <param name="subscribe_depth"  type="bool" value="false"/>
     <param name="approx_sync"      type="bool" value="false"/>

     <remap from="left/image_rect"   to="/stereo_camera/left/image_rect_color"/>
     <remap from="right/image_rect"  to="/stereo_camera/right/image_rect"/>
     <remap from="left/camera_info"  to="/stereo_camera/left/camera_info"/>
     <remap from="right/camera_info" to="/stereo_camera/right/camera_info"/>

     <remap from="odom" to="/stereo_camera/odom"/>

     <param name="queue_size" type="int" value="30"/>

     <!-- RTAB-Map's parameters -->
     <param name="Vis/MinInliers" type="string" value="12"/>
  </node>
 </group>
</launch>
For visualization, I recommend to try the stereo outdoor mapping tutorial to see what is going on with rviz. To use rtabmapviz, you can add the node under rtabmap namespace above:
<group ns="rtabmap">
  <!-- Visualisation RTAB-Map -->
  <node pkg="rtabmap_ros" type="rtabmapviz" name="rtabmapviz" args="-d $(find rtabmap_ros)/launch/config/rgbd_gui.ini" output="screen">
     <param name="subscribe_stereo"    type="bool"   value="true"/>
     <param name="subscribe_odom_info" type="bool"   value="true"/>
     <param name="queue_size"          type="int"    value="10"/>
     <param name="frame_id"            type="string" value="base_link"/>
     <remap from="left/image_rect"   to="/stereo_camera/left/image_rect_color"/>
     <remap from="right/image_rect"  to="/stereo_camera/right/image_rect"/>
     <remap from="left/camera_info"  to="/stereo_camera/left/camera_info"/>
     <remap from="right/camera_info" to="/stereo_camera/right/camera_info"/>
     <remap from="odom_info"         to="/stereo_camera/odom_info"/>
     <remap from="odom"              to="/stereo_camera/odom"/>
  </node>
</group>
Navigation
The rtabmap node uses the laser scans to create a 2D occupancy grid map that can be used by a planner (see grid_map topic). If you don't have laser scans, you can create with rtabmap node with proj_map topic a 2D occupancy grid map from the projection of the Kinect or Stereo point clouds on the ground. Visit the StereoOutdoorNavigation page for an example of creating such maps.
Remote visualization
rtabmapviz
To make rtabmapviz easily communicate with rtabmap node, launch it in the same namespace than rtabmap, so that all topics and services can be directly connected without remappings.
$ export ROS_NAMESPACE=rtabmap
$ rosrun rtabmap_ros rtabmapviz _frame_id:=base_link
rviz
When RTAB-Map's ros-pkg is built, the rtabmap_ros/MapCloud plugin can be selected in RVIZ for visualization of the constructed 3D map cloud.
$ rosrun rviz rviz
Remote visualization: bandwidth efficiency with RVIZ
rviz
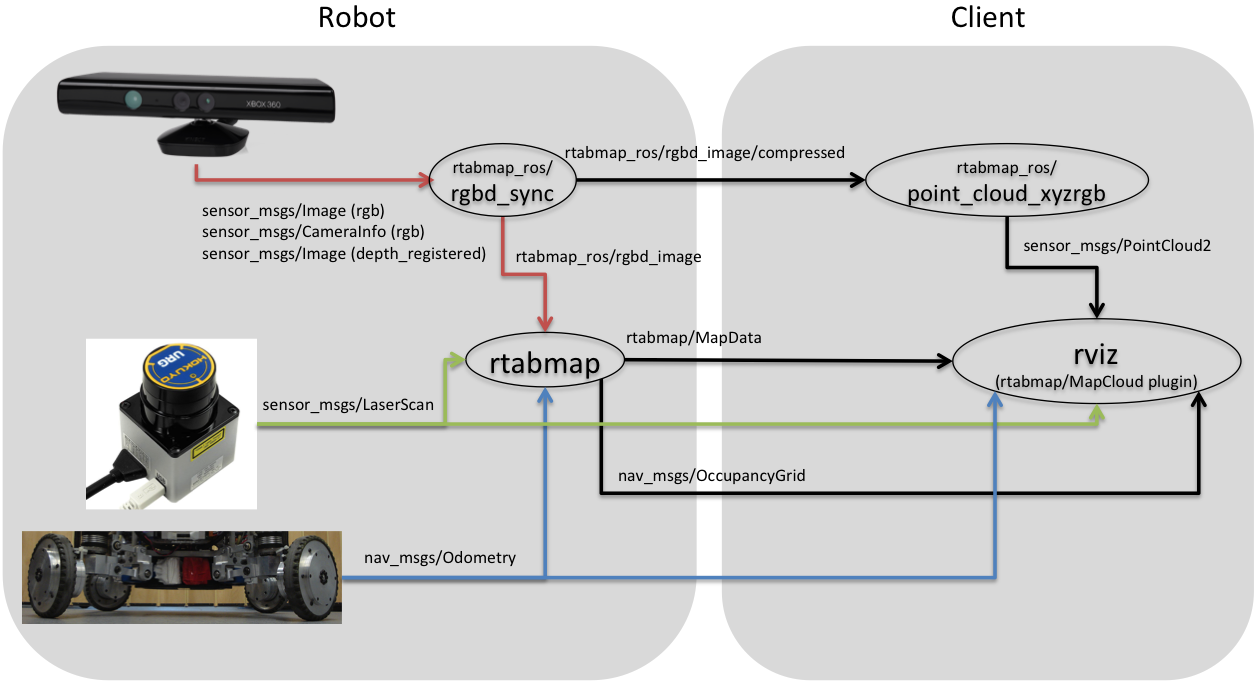
Use the following for rviz:
<launch>
  <node pkg="rviz" type="rviz" name="rviz"/>

  <!-- Construct and voxelize the point cloud (for fast visualization in rviz) -->
  <node pkg="nodelet" type="nodelet" name="points_xyzrgb" args="standalone rtabmap_ros/point_cloud_xyzrgb">
    <remap from="rgbd_image"      to="/rtabmap/rgbd_image/compressed"/>
    <remap from="cloud"           to="voxel_cloud" />

    <param name="queue_size" type="int" value="10"/>
    <param name="voxel_size" type="double" value="0.01"/>
  </node>
</launch>
rtabmap_ros/point_cloud_xyzrgb nodelet creates a point cloud from the RGB and depth images, with optional voxel size (0=disabled).
Remote mapping
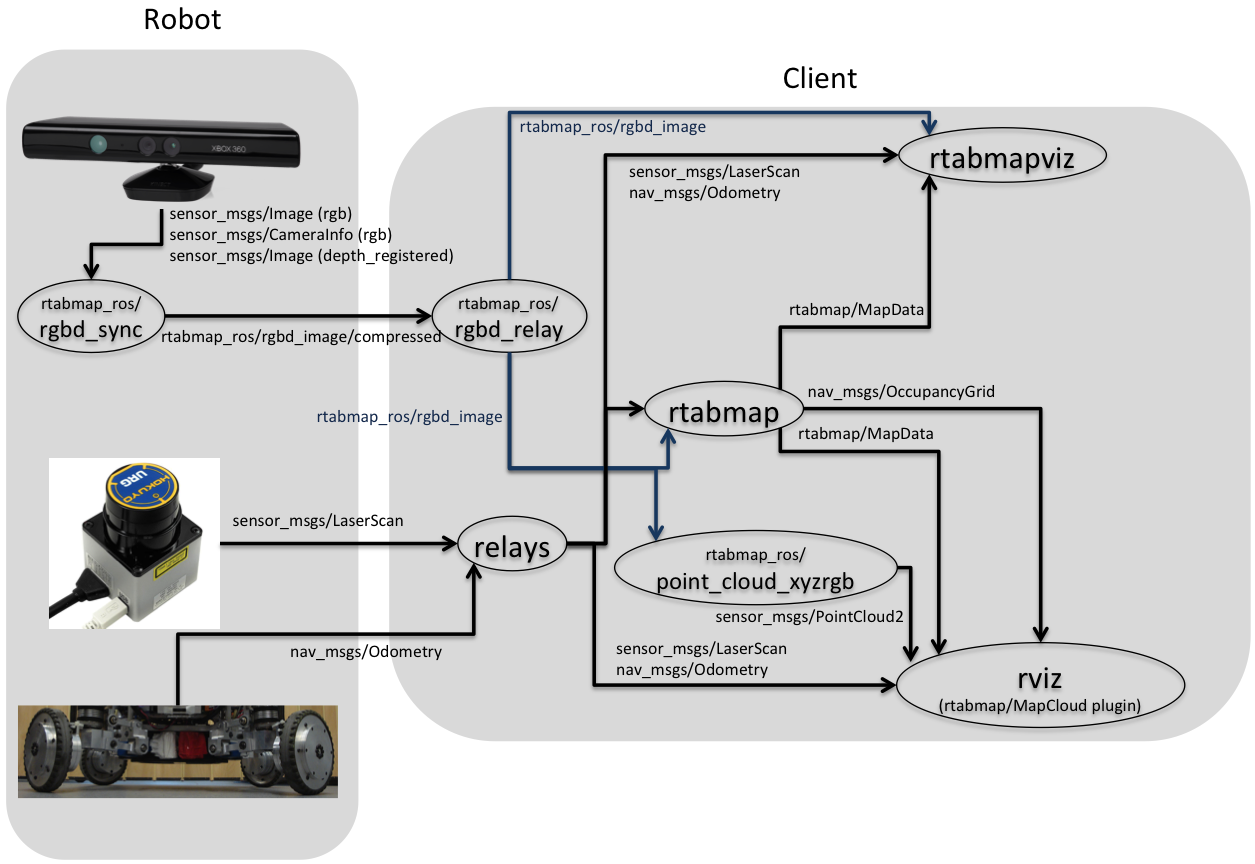
EDIT (February 4 2016): There is now a simple tutorial about remote mapping with a Kinect here: http://wiki.ros.org/rtabmap_ros/TutorialsOldInterface/RemoteMapping
Switching between Mapping and Localization
It can be convenient after mapping an area to put rtabmap in localization mode to avoid increasing the map size in already mapped areas. If you are using rtabmapviz, there are already buttons on the interface:

Otherwise, you can call the set_mode_mapping and set_mode_localization services.
 $ rosservice call rtabmap/set_mode_localization
 $ rosservice call rtabmap/set_mode_mapping


